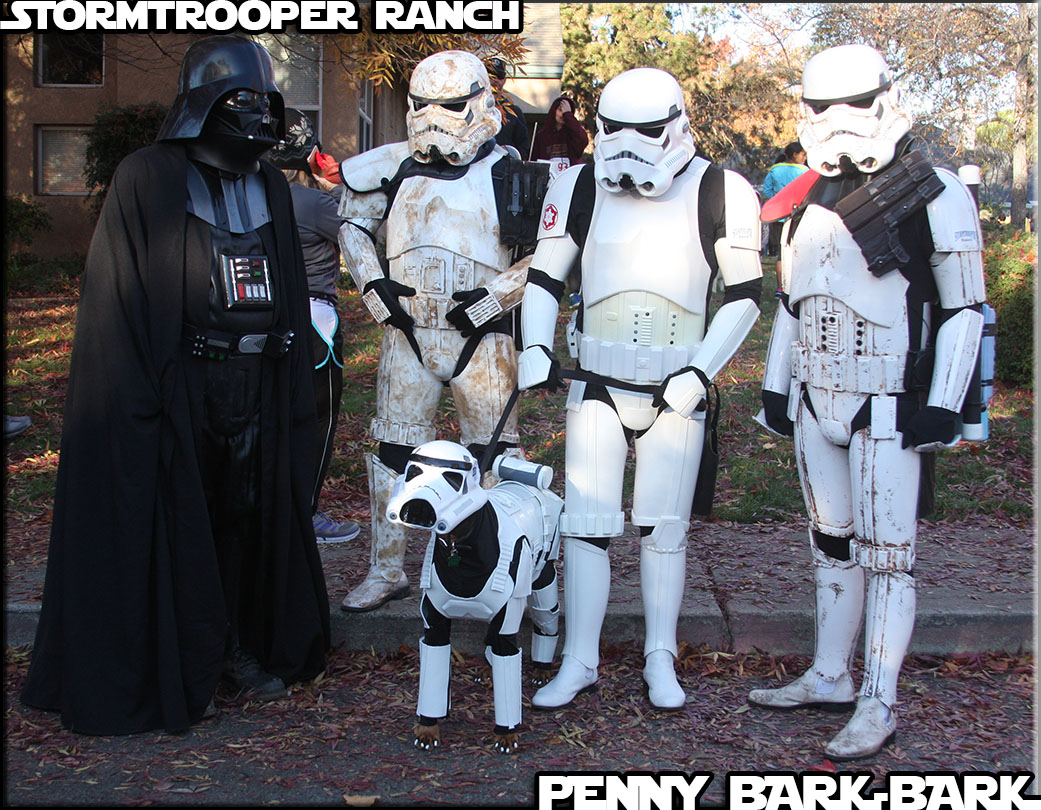
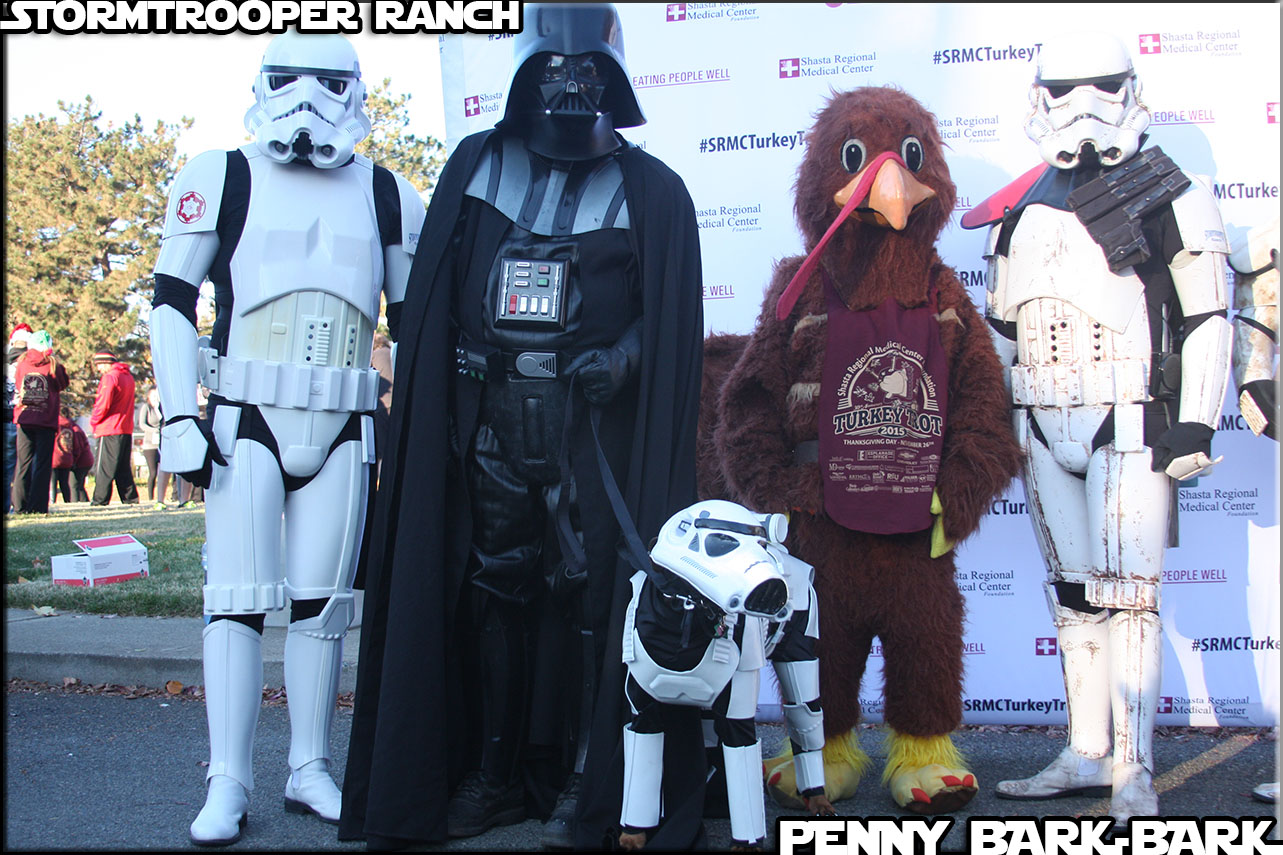
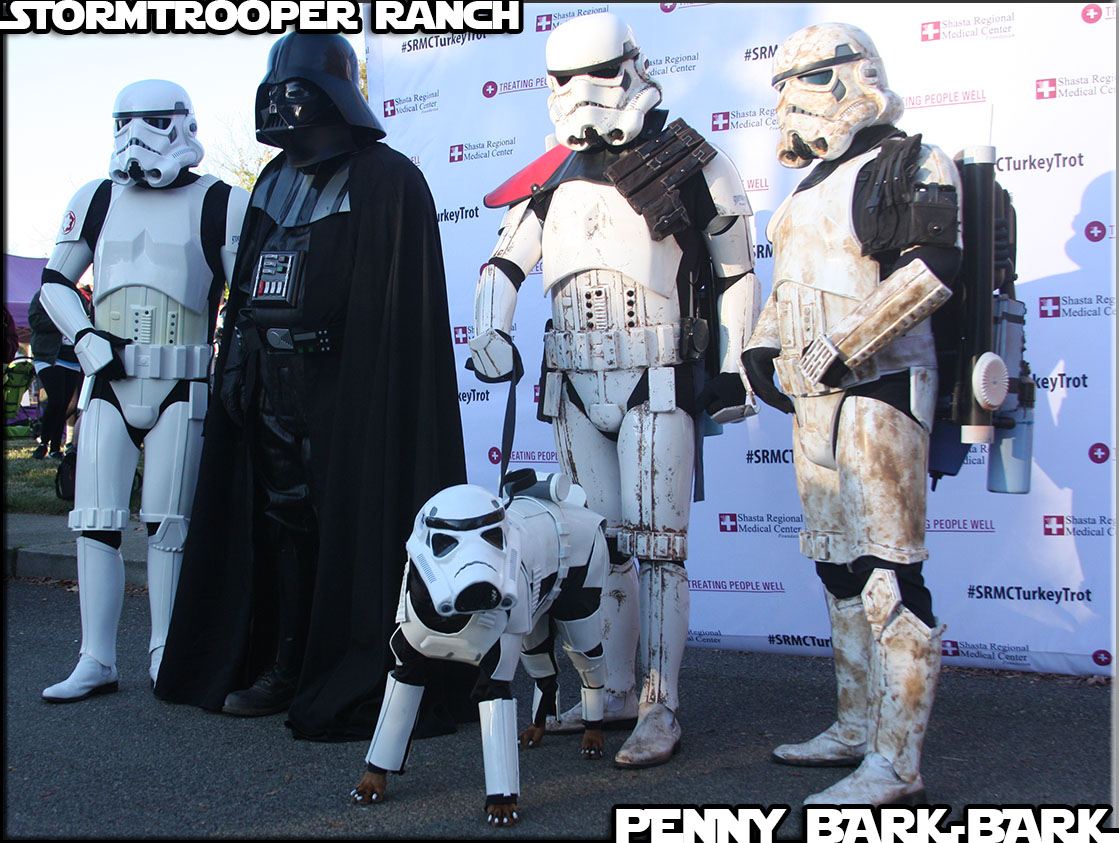
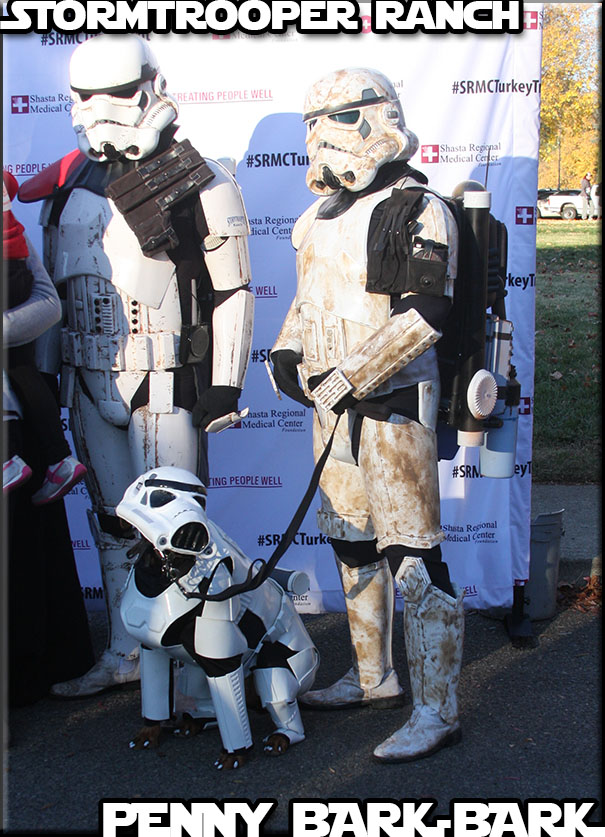
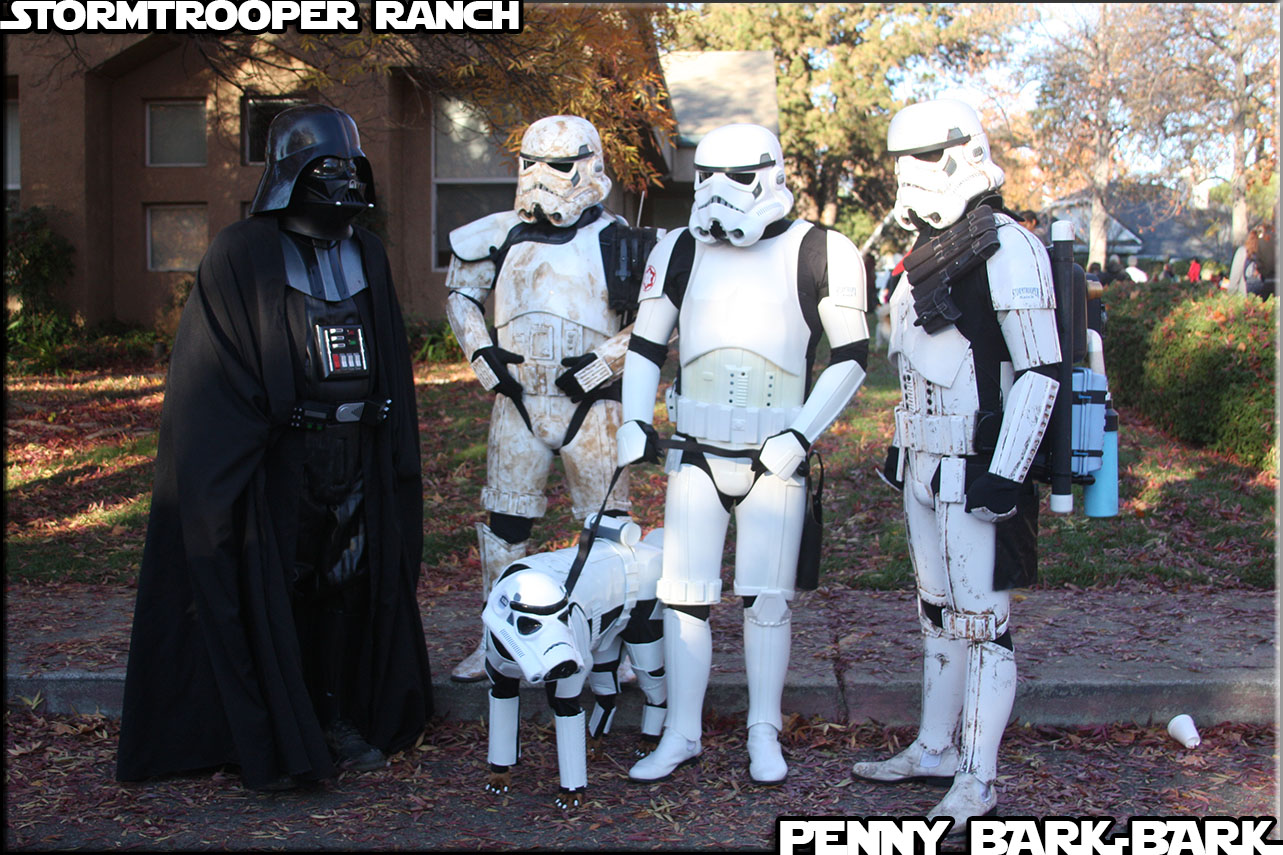
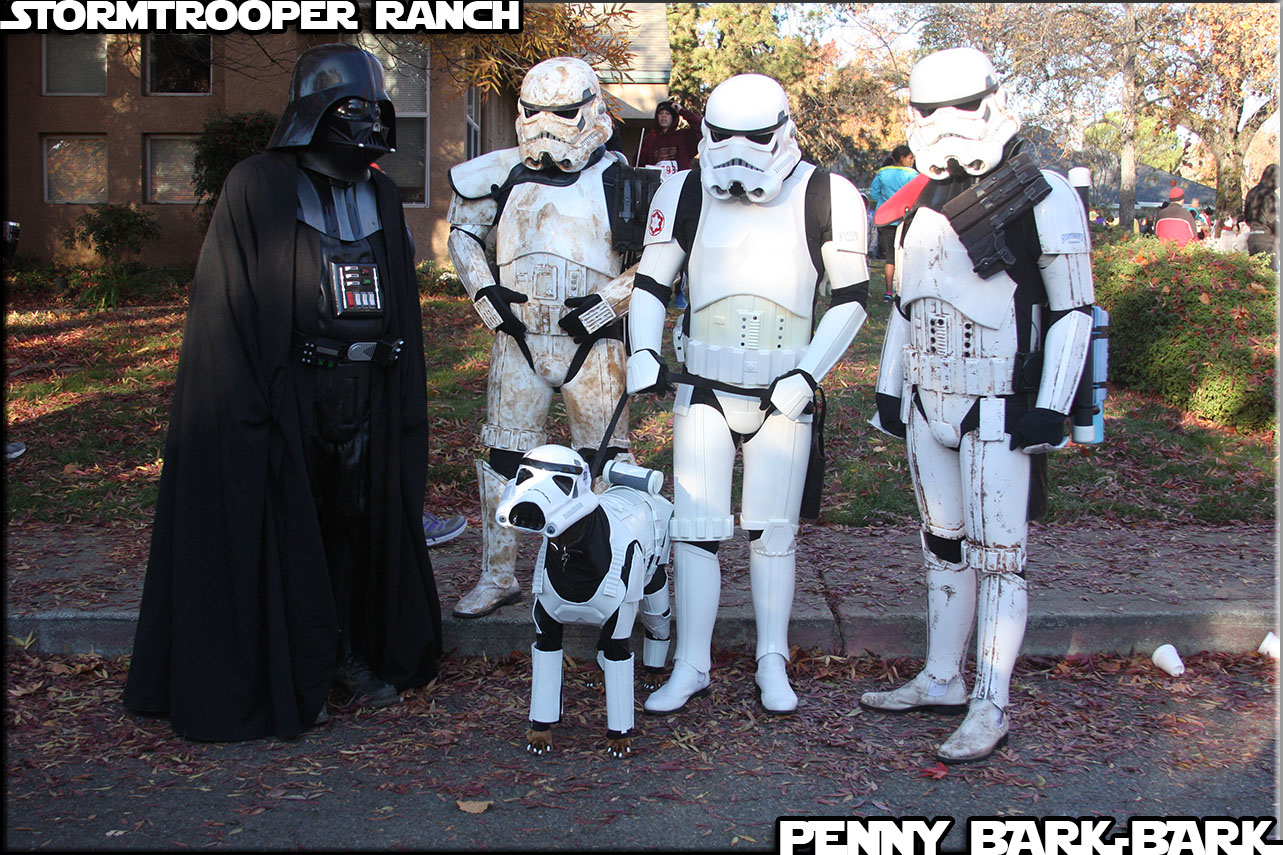
It’s been a while since we had time to post any updates/reviews but with the recent news articles making their rounds I wanted to clarify a few things.
First, Mom’s name was spelled wrong, so if you look up Sabrina Ridley, you wont find her. No biggie though because she prefers people just contact me directly on my Facebook page.
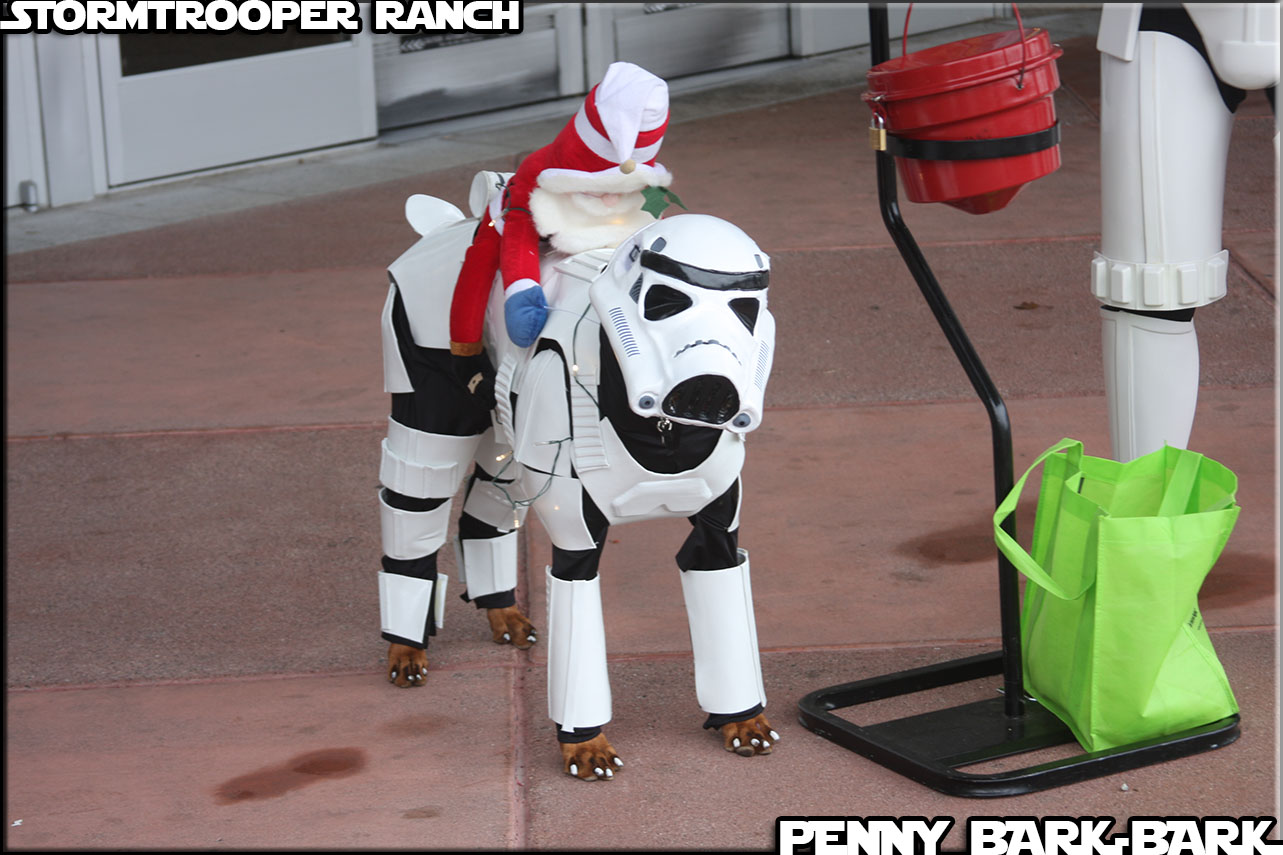
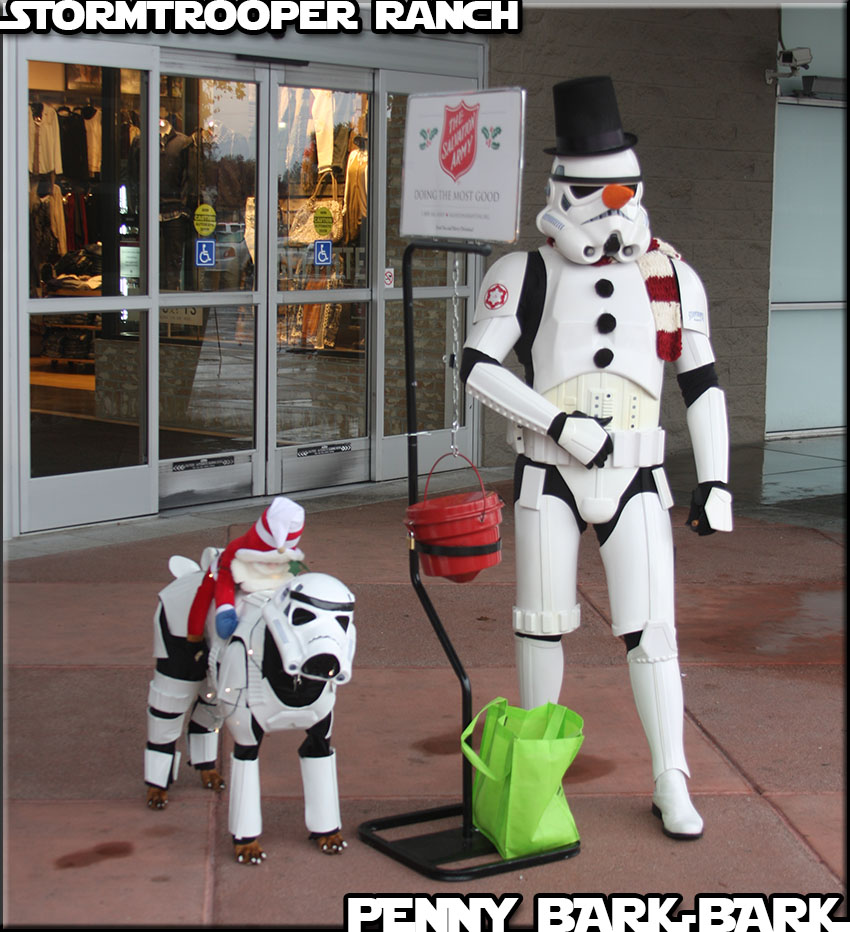
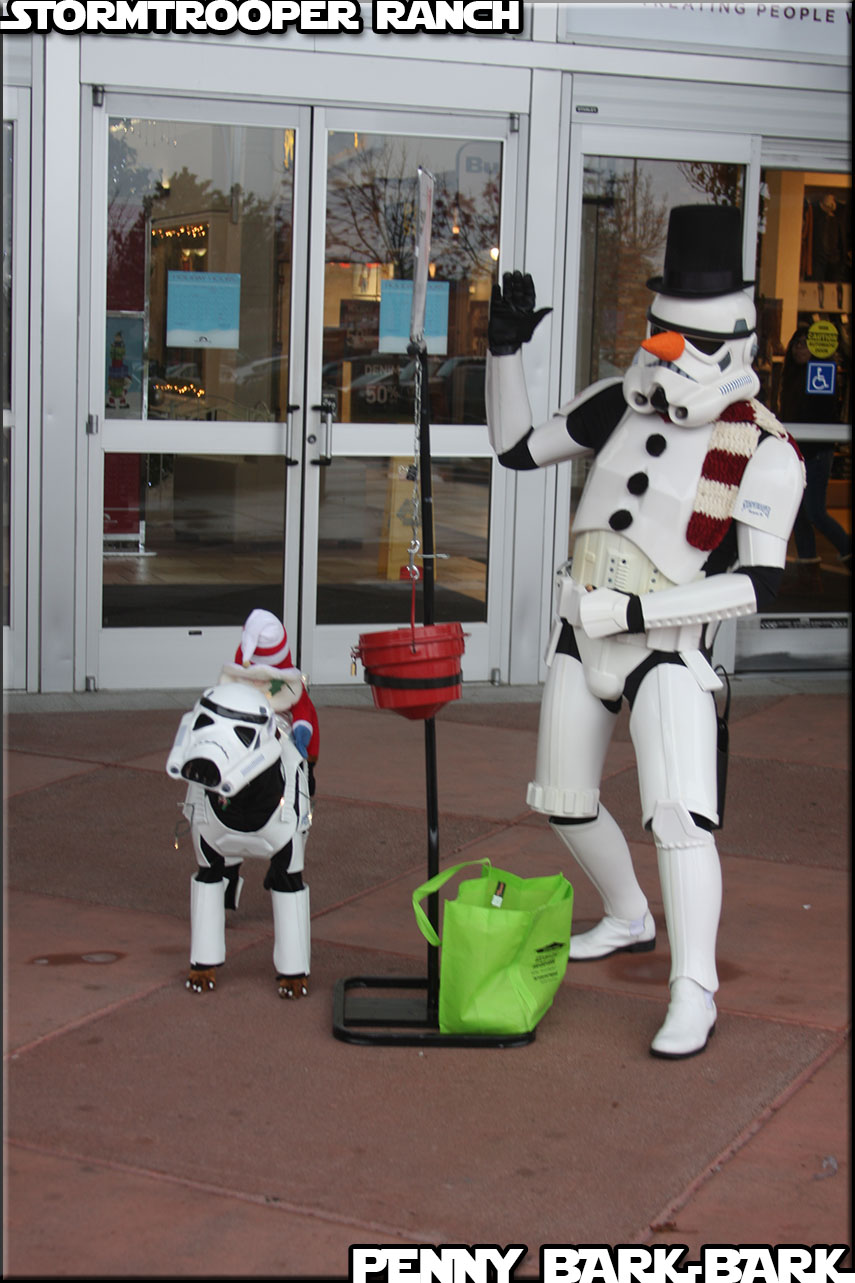
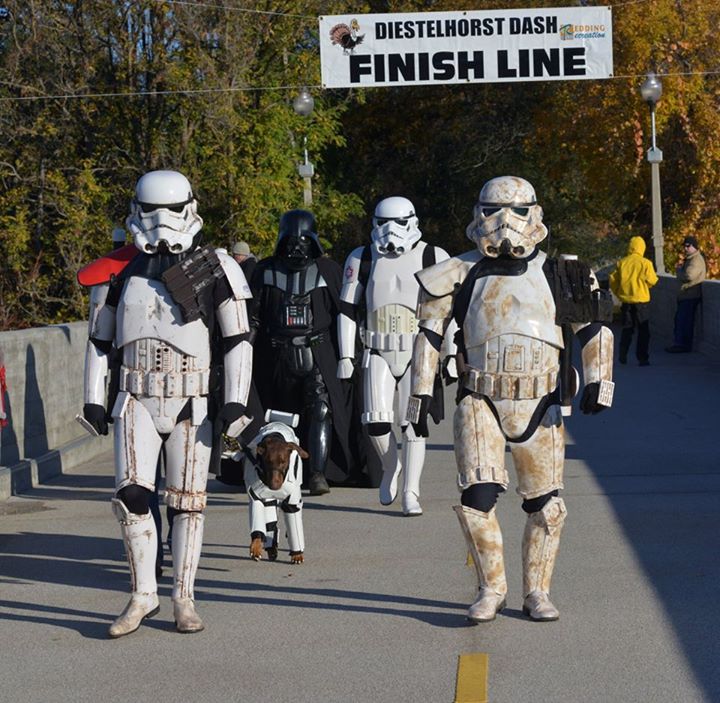
Second, it says Stormtrooper Ranch collects money for charities, they do not. We simply make appearances for charities/non-profits. Information on Stormtrooper Ranch can be found here: http://stormtrooperranch-theoneandonly.com/. If you are looking to have Stormtrooper Ranch to come out to your event go ahead and contact them through the information on their website. I can’t always make every event and I won’t be doing events once it gets hot out (unless I am invited to an air conditioned building). If there aren’t any members near you, you can try the 501st, they are much larger and do the same things for non-profits.
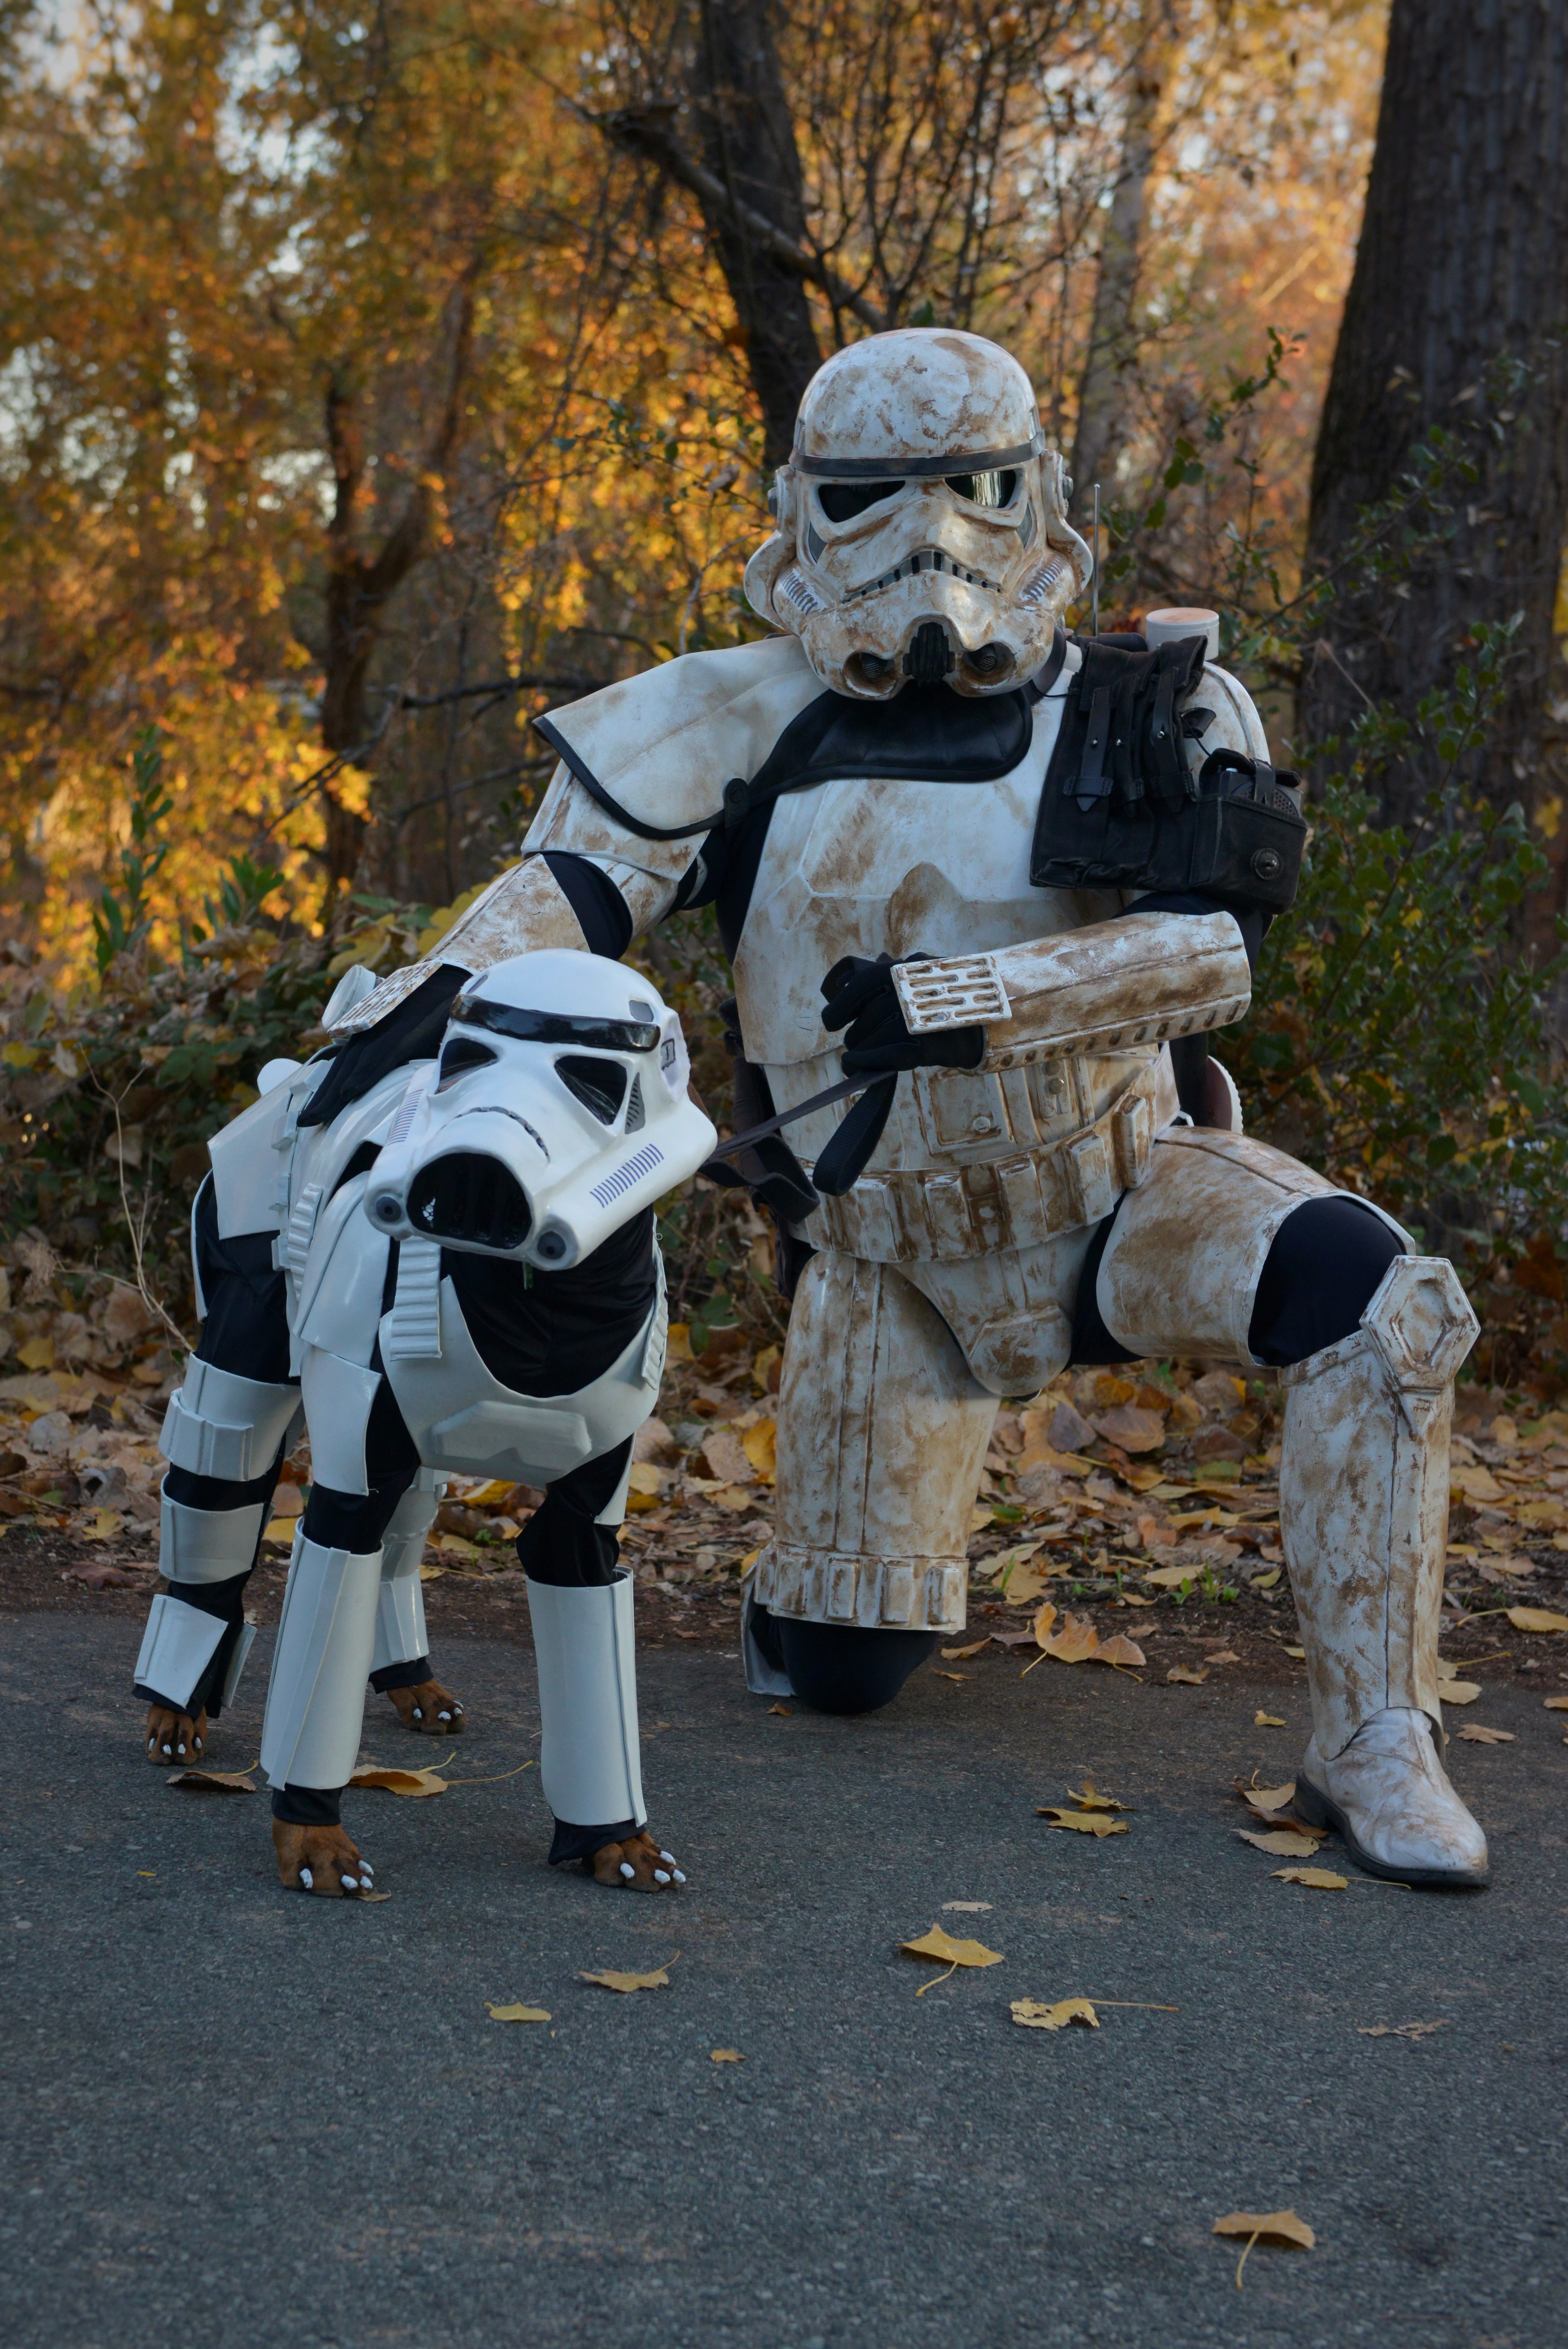
Now some other notes, the article make it sound like Mom fiberglassed my head, there was a lot more to the process, but the fiberglass cast (like they use to set broken bones) was used to make a thin base to put the clay on. More information on the helmet build can be found here: Stormtrooper Helmet Build – Doggie Style!
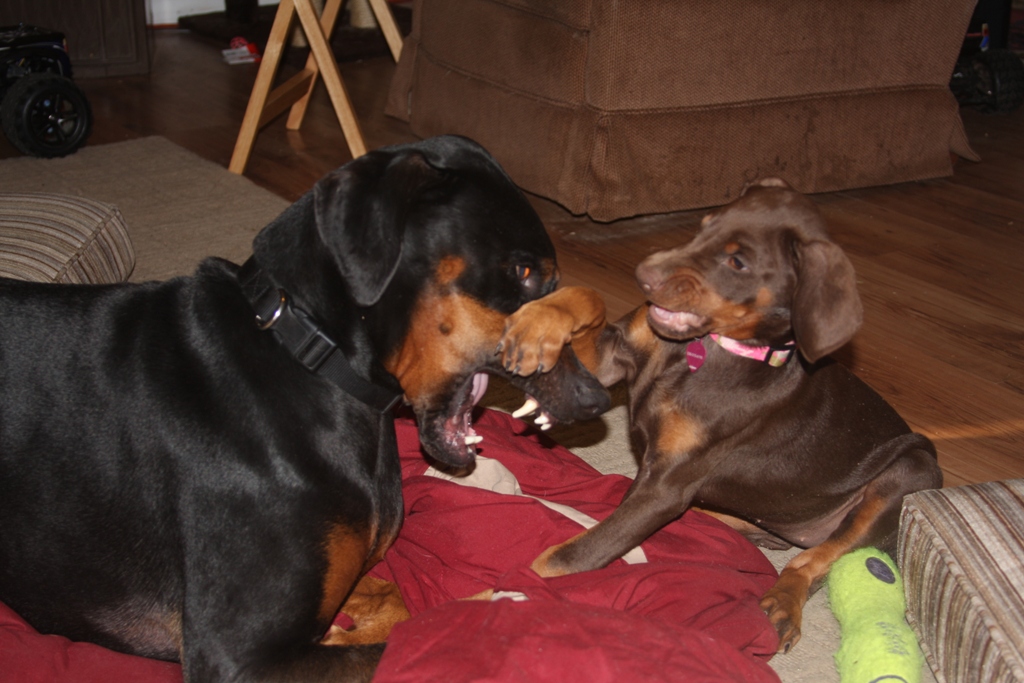
For those of your that say this is cruel I will have you know that this helmet was specially made for me and if I didn’t want to wear it, I wouldn’t (ask anyone that has tried to trim my toenails, it’s a circus event). I certainly wouldn’t be wearing it to charity events and events held my the humane societies. If I do want it off, I just tell Mom and she takes it off (making the human Stormtroopers jealous). If I need to take a break, I get to, Mom event has a whole travel kit with blankets, treats, and water. I can sit down, lay down and go potty in my costume if I need to and can quit at anytime. Then what do I get out of this? Besides all the attention, people talking to me, petting me, I would say I loved the moment two little girls came up to me at an event then gave me big hugs, well it was more than hugs, for a minute I thought I was going to have to take one home since she wasn’t letting go. Then Mom loves that people stick around and talk, so they are more likely to help the charity we are helping.
I think I need to write up a tutorial on the suit and my next helmet build, but until then here are some more pictures for your enjoyment.
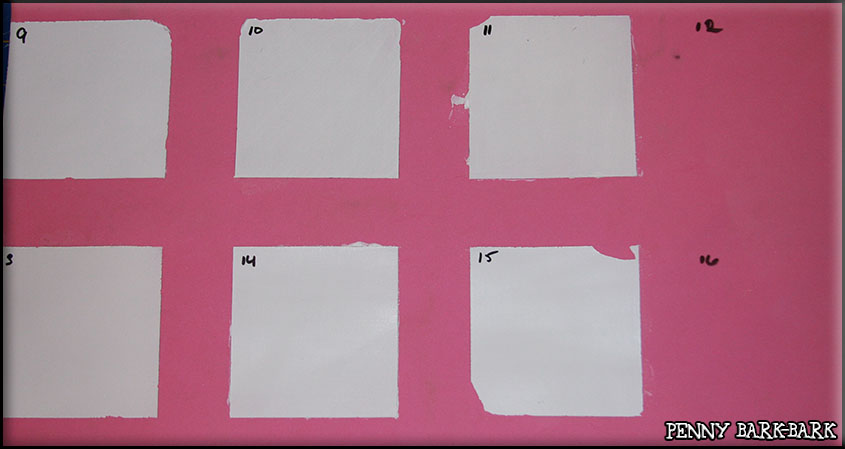
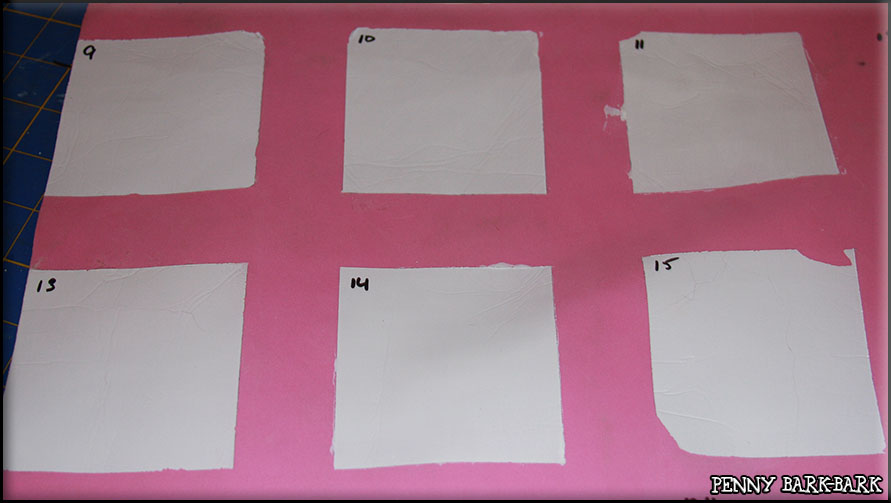
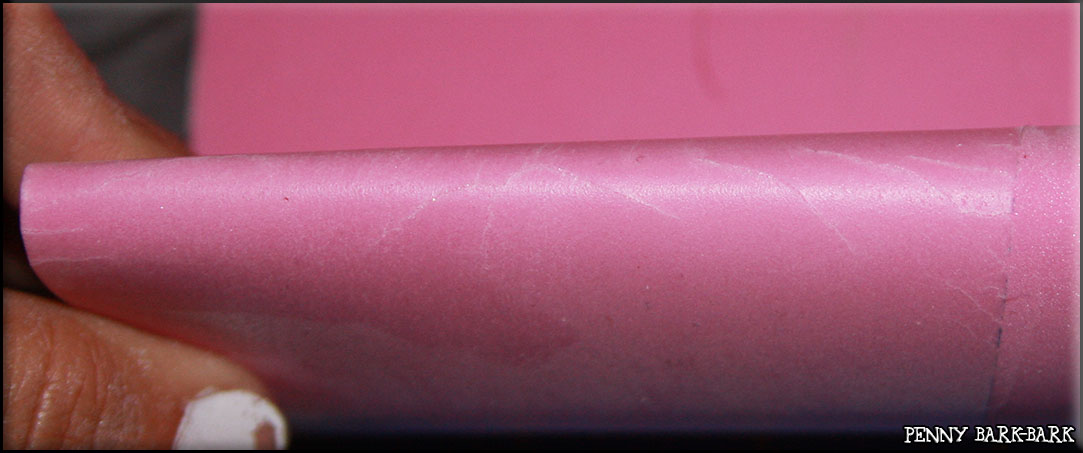
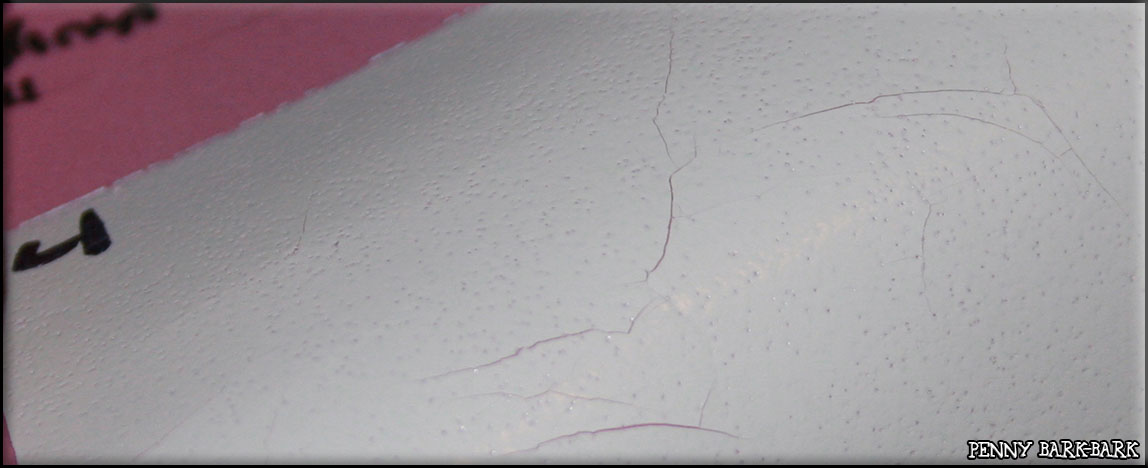
15. Adhesion Promoter (3 layers), PVA/Latex mix (4 layers) then Vinyl and Fabric spray paint.
16. Unused.
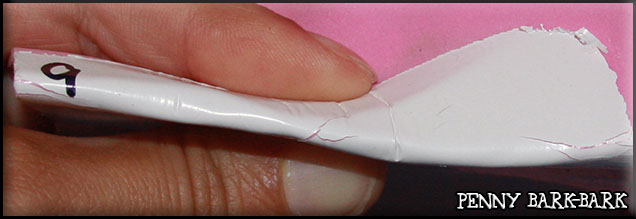
9. PVA/Latex mix (4 layers) with Vinyl and Fabric spray paint.
When removing the masking tape I had a bit of paint peel and the pinch test showed cracking. Crumple test left marks also.
10. PVA/Latex mix (4 layers) with acrylic paint.
Slight peeling when the masking tape was removed, but NO cracks and of course the crumple test left marks (that is pretty much a given no matter what you do)
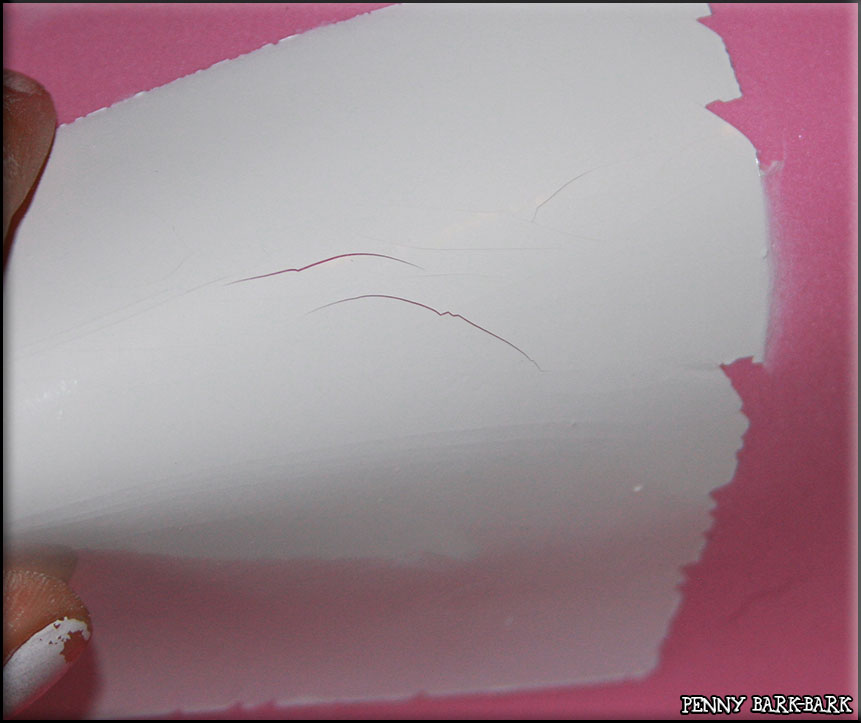
11. PVA/Latex/Acrylic mix (5 layers).
After really pinching excessively I did get some cracking, but we had to really keep going to get that to happen. A little peeling when masking tape removal and same results on crumple tests.
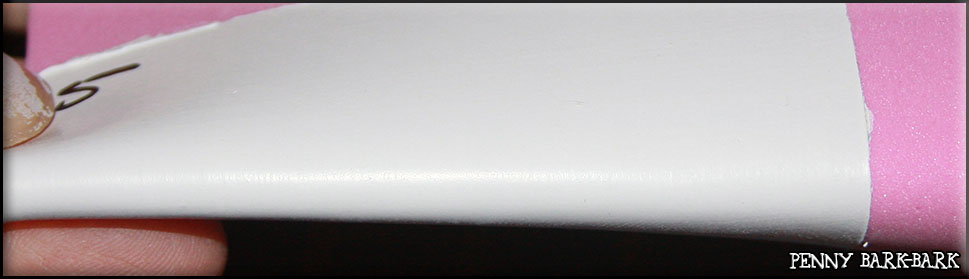
No cracking, crumple test was the same, but no peeling.
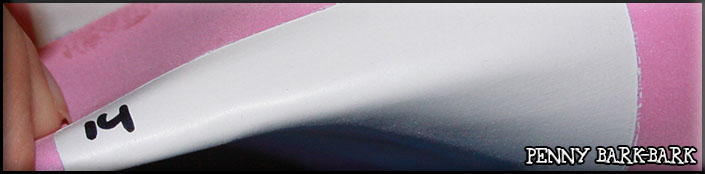
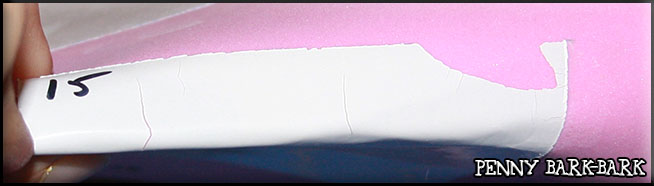
15. Adhesion Promoter (3 layers), PVA/Latex mix (4 layers) then Vinyl and Fabric spray paint.
Cracking, big chunks peeled with masking tape removal and same results on the crumple test.
Conclusion, 10, 11 & 14 are the best with 14 really winning because of the peeling on masking tape removal, now if we can dial in the latex mix like I did the first time around we might have found another go-to mix!
When it comes to Doggie Cosplay the most important component is a patient dog (like me!) then second most important component is flexibility of your costume. Us pups are wiggly and we bend in ways you wouldn’t believe. If you choose to work with craft/EVA foam one of the biggest problems you are going to have is painting the foam. A quick Google search will tell you when you paint craft foam you have to seal it first otherwise you will never get complete coverage. A lot of people figure after you seal it then you can just spray paint it for a nice even finish, which is great if your foam will never flex but the moment it does you will have cracks ruining all of your hard work (barking from experience!).
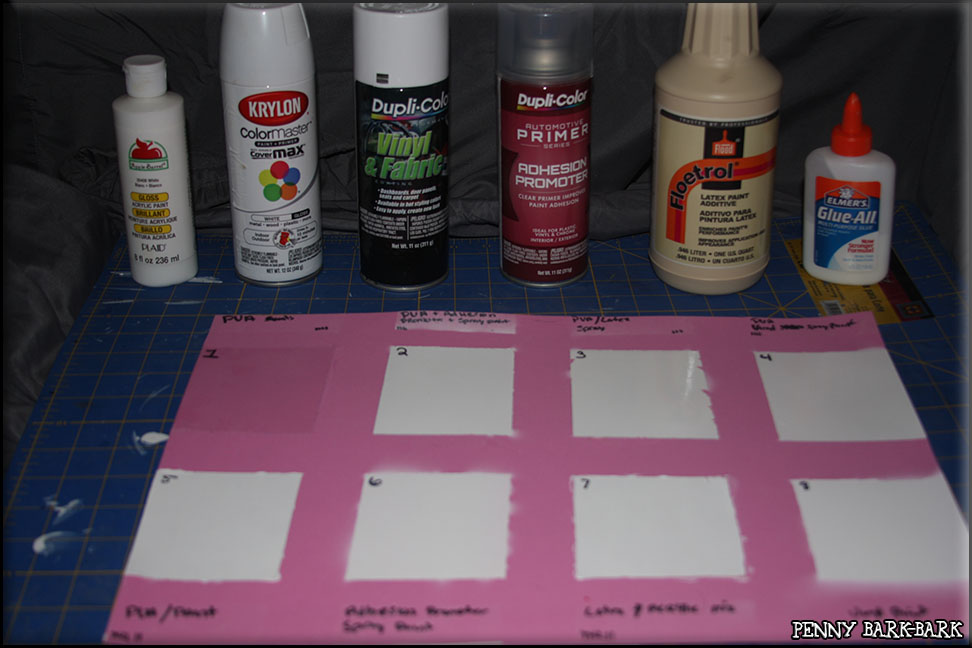
After learning this lesson the hard way we have took the time to put together a test of different formulations. If you have done your research you will find people mainly use two methods to seal foam, watered down PVA (white Elmer’s glue) or Mod Podge. For this test we only bothered with PVA because we read a lot of complaints about Mod Podge cracking.
Here is our painted panel before any flex test along with the products we used.
Description of each square
1. PVA glue watered down (5 layers).
2. PVA glue watered down (5 layers), followed by 3 layers of Adhesion Promoter, then 4 layers of Krylon spray paint.
3. Mix of PVA with Latex Additive (3 layers), followed by 4 layers of Krylon spray paint.
4. PVA glue watered down (5 layers), followed by 5 layers of Vinyl and Fabric spray paint.
5. PVA/Paint mix not watered down.
6. Adhesion Promoter (3 layers), followed by Krylon spray paint.
7. Acrylic paint with latex additive (7 layers).
8. Vinyl and Fabric spray paint (5 layers).
Results after folding each section in half then rolling this fold up and down. Then crumpling the whole thing.
1. PVA glue watered down (5 layers).
We did this just to see how PVA alone handled flexing. We did 5 layers based on the feel of the foam after each layer, we put on layers until we got a smooth finish that felt like the foam was sealed and ready for painting. After bending the foam in half, it cracked, not a good sign! After the crumple test it retained the crumple marks.
2. PVA glue watered down (5 layers), followed by 3 layers of Adhesion Promoter, then 4 layers of Krylon spray paint.
Big fail here, the fold test just cracked every which way. The finish on this was also very poor like it didn’t seal completely. A few more layers of PVA might have taken care of that issue, but with the cracking it’s not work another test.
Update 9/27/14, after painting the back side of the foam and testing that paint, #2 has become a crumbly mess.
3. Mix of PVA with Latex Additive (3 layers), followed by 4 layers of Krylon spray paint.
I have mixed feeling on this. The PVA with latex only took 3 layers and probably could have done with just two, however we didn’t bother feeling the finish until after the 3rd. After that PVA/latex the finish was VERY smooth and we knew this could make a beautiful finish. After the fold finish there were a few big cracks, but just in certain sections. Unlike the other sections that cracked folding different directions this only generated a few cracks. However the crumple test did leave some indents. I am wondering if the cracks are from areas that got a little less latex in the mix. I do think this formula will work for foam that flexes but not bends in half and just great for sealing foam that doesn’t bend. The only other down side I saw it when we peeled off the painters tape, if you look at the edges you can see some peeled. We might play more with this formula more.
4. PVA glue watered down (5 layers), followed by 5 layers of Vinyl and Fabric spray paint.
Fail again, lots of cracking and a pocked finish like it wasn’t seal. Enough said.
5. PVA/Paint mix not watered down.
This if our go-to, seal and color at the same time. No cracks at all, but the crumple test did leave some indents. The edges bled a little into the painters tape and a little peeled off with the tape. However right now this is still the go-to easy mix. I might try adding some latex to this mix to see if we get the perfect trio. If you use this mix and end up with crumple marks, it does fill in with a few more layers of the mix.
6. Adhesion Promoter (3 layers), followed by Krylon spray paint.
Speckled finish and lots of cracking (sounded like Rice Krispies during the tests), so fail.
7. Acrylic paint with latex additive (7 layers).
This is another good mix, but it has a couple downfalls. No cracking, no indents, however we had brush strokes and when we lifted the painters tape a big chunk of the paint wanted to peel off. This once again brings me back to what I said in #5 that I should try a mix of acrylic paint, latex, PVA and maybe even try watering it down a bit.
8. Vinyl and Fabric spray paint (5 layers).
No cracking, but shows indents after crumple. However this one is very speckled from not being sealed, however I do have to say it took color well. With the way it flexed we may also try to seal with PVA/Laxtex then using this as a top coat.
Update 9/27/14, after painting the back side of the foam and testing that paint, #8 like #2 has become a crumbly mess.
Conclusion
PVA is a must to allow the foam to take color. The best mix was #5, followed by #7 If possible also use a foam that is close to your final color just in case you do get cracking. with the best sealing coat being the PVA/Latex mix.
If anyone has any other mixes, let me know and I will see if I can test them. When I get around to testing a PVA/Latex/Acrylic mix and PVA/Latex with Vinyl/Fabric top coat samples I will go ahead and post an update.
Update 9/27/14 I did some more tests on the backside of this foam, here are the results.
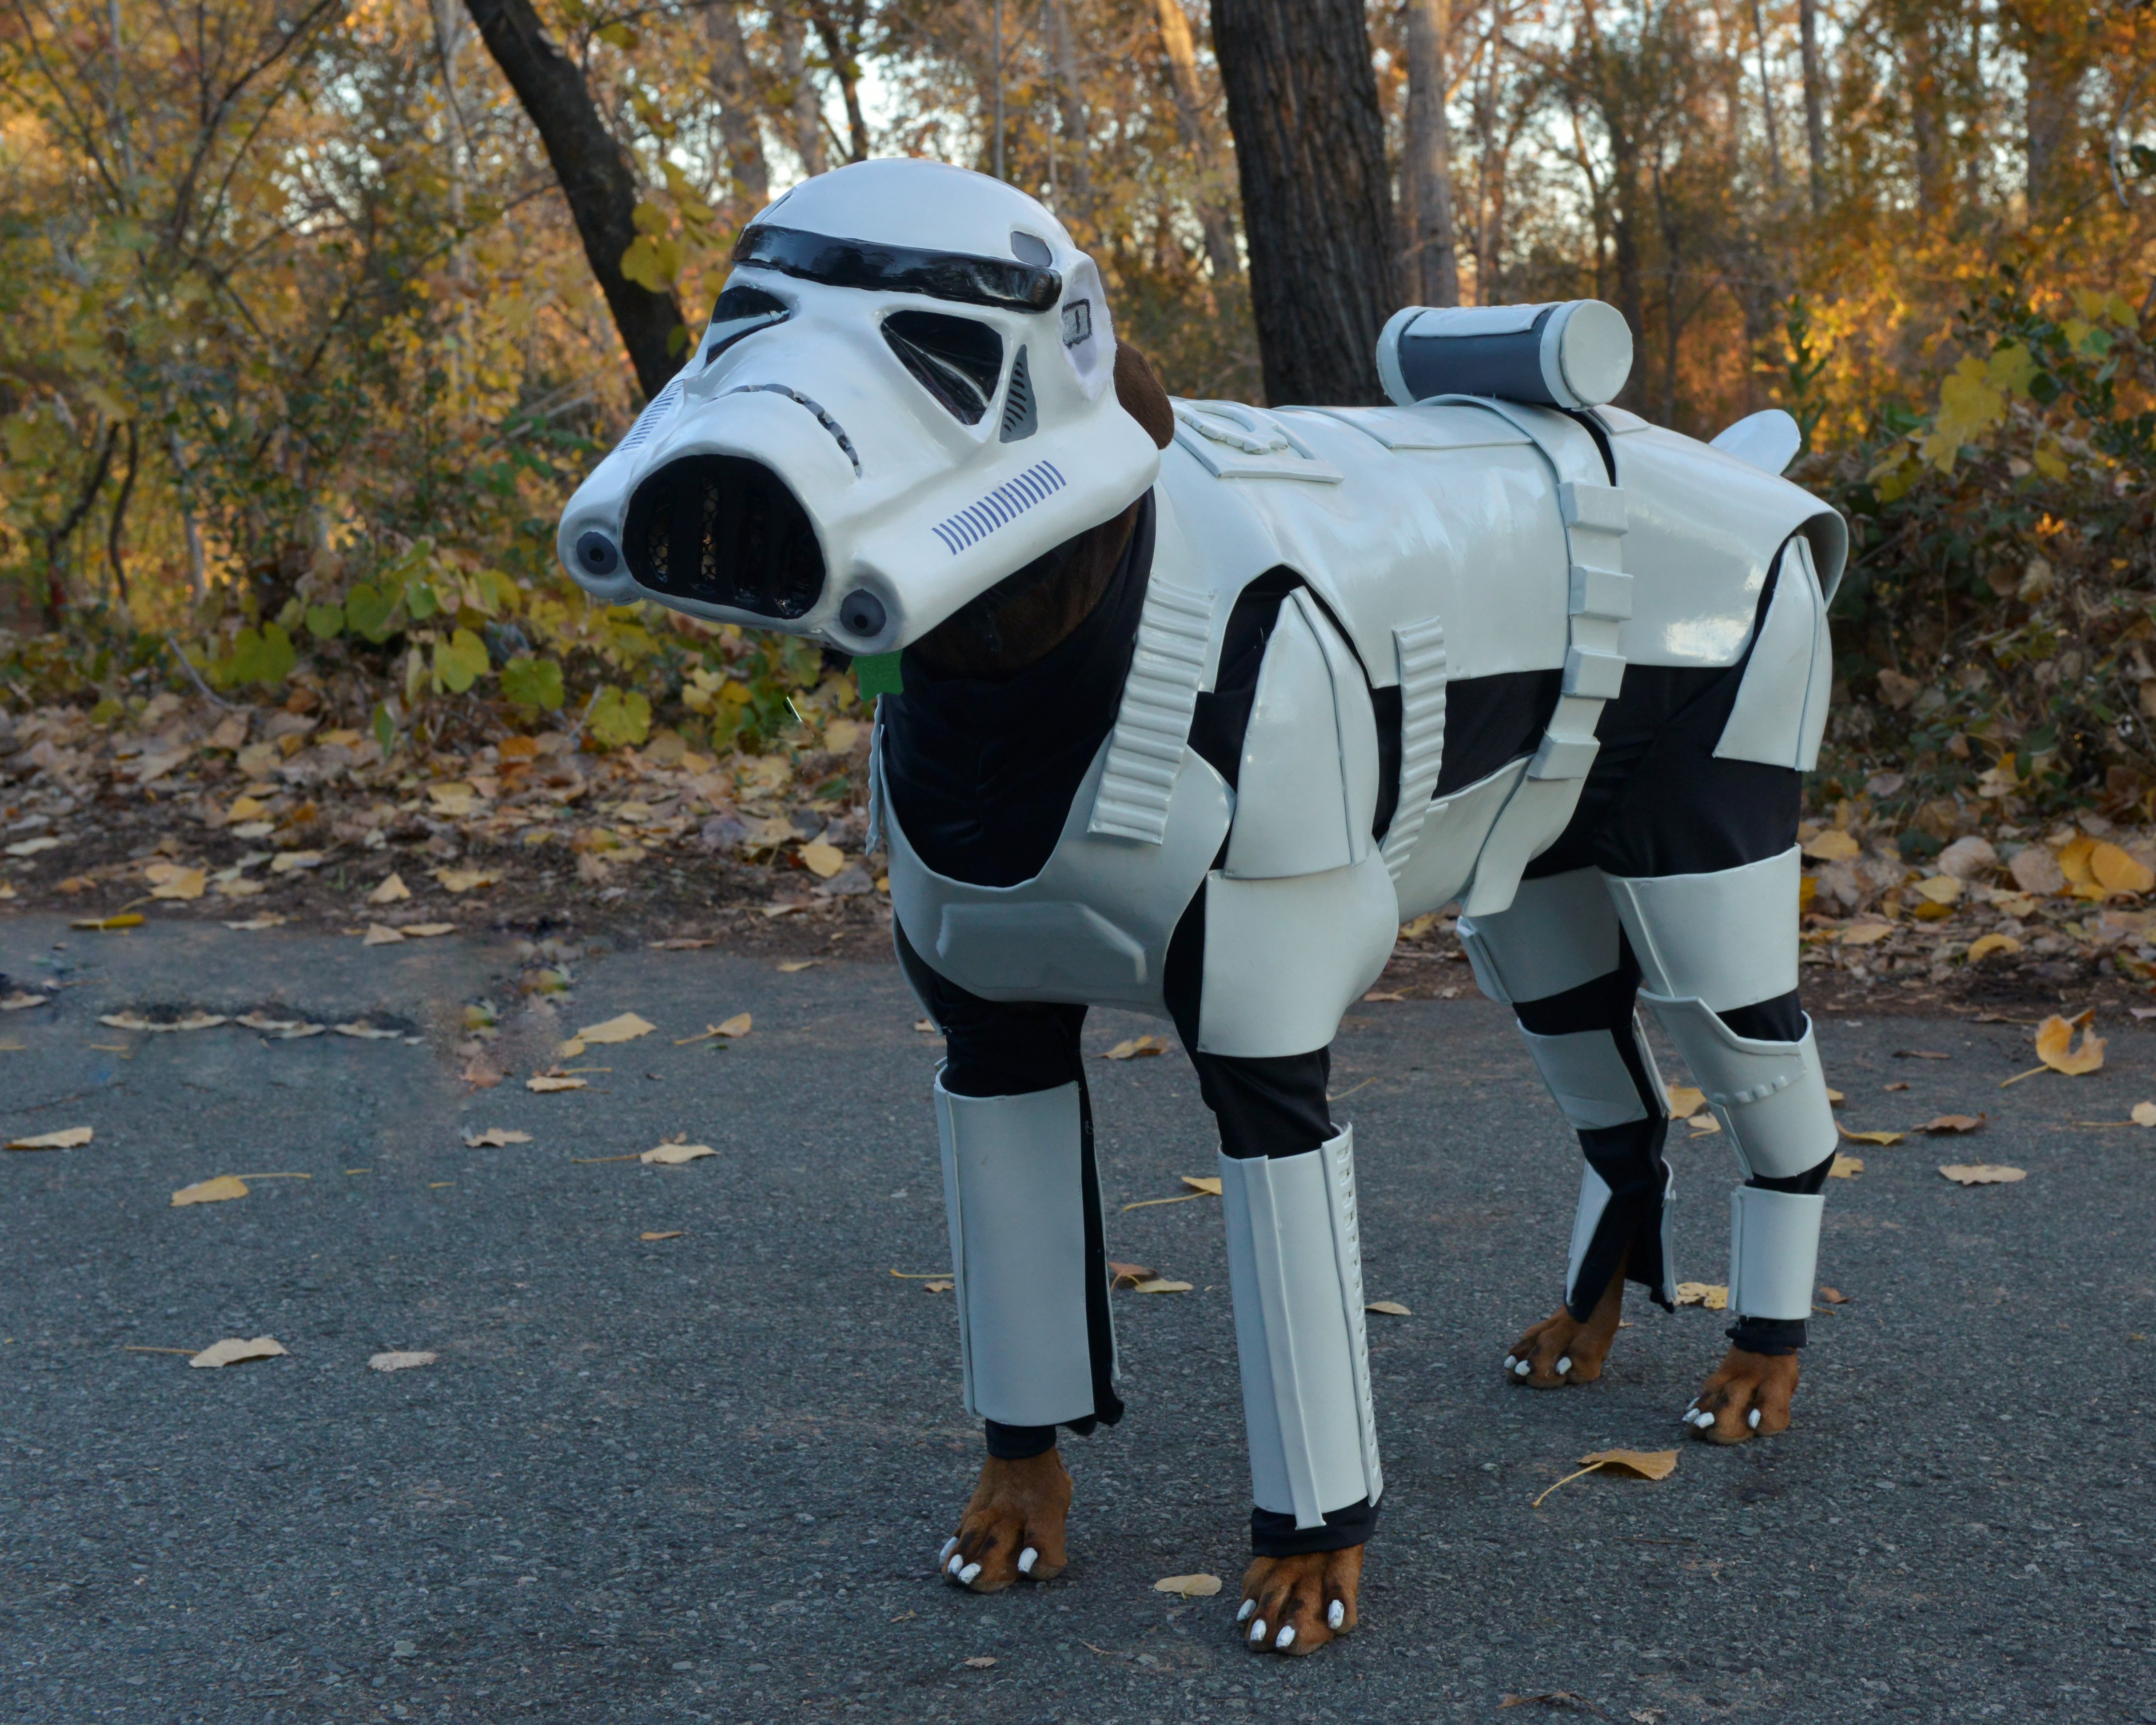
I am going to keep this as short as possible. We by no means are experts and this was our first sculpt and cast of any sort so if you are looking for a detailed how-to I would suggest googling tutorials on the different subjects. By “we” I mean Mom, without opposable thumbs I had to leave the work to her while I barked orders over her shoulder.
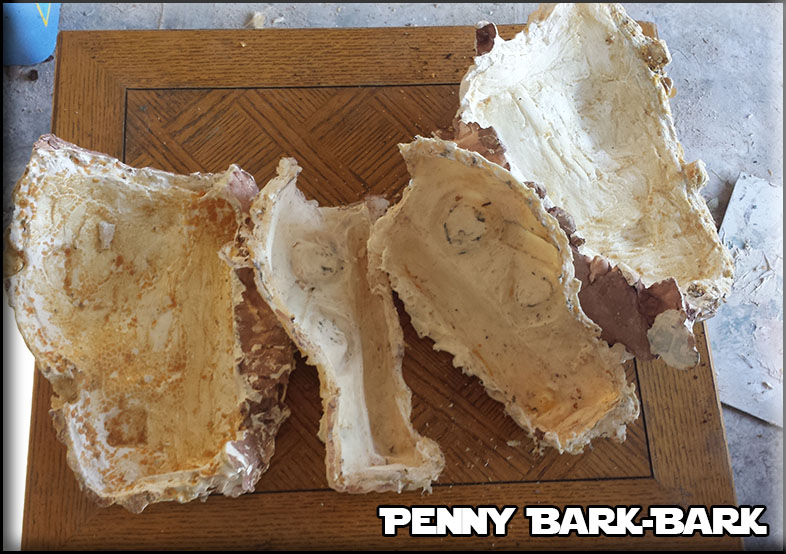
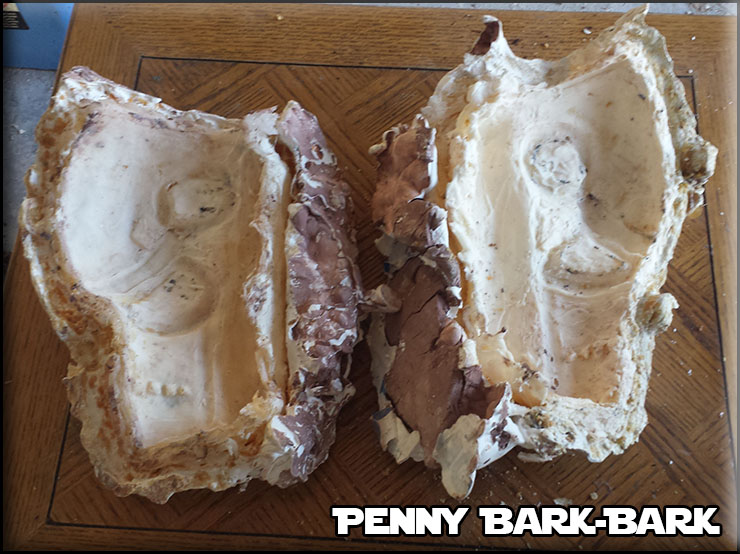
As much as we would have loved to use a modified pepakura build we knew with my long muzzle that wasn’t going to happen so we would have to do something custom. Lets start with the first and most important part to this build… ME!!! None of this could be done if I weren’t a very tolerant dog. I have been dressed up in one way or another since I came home as a little pup so this build was nothing new to me but most dogs will have a big issue with it. To start this build we had to start with a mold of my head. For this build Mom wrapped my head in a nice thick soft towel (eyes and all) then used fiberglass casting material to cast the top half of my head. The towel not only protects me, it also allows extra room in the helmet to breath and add padding for adjustment and comfort (we planned on making it out of fiberglass), it’s better to have the helmet to big than too small. For the cast itself we used fiberglass casting material we bought off Amazon a while back for another project, this is the medial supply stuff made for broken bone casts. However we only used this since it was laying around and less messy, however we have also done a casting in a plaster and hemp strip mix (much like older humans casts) and this takes soooooo much longer to dry, is messy but supplies are easy to find local.
Sorry, no pics of the casting of my head.
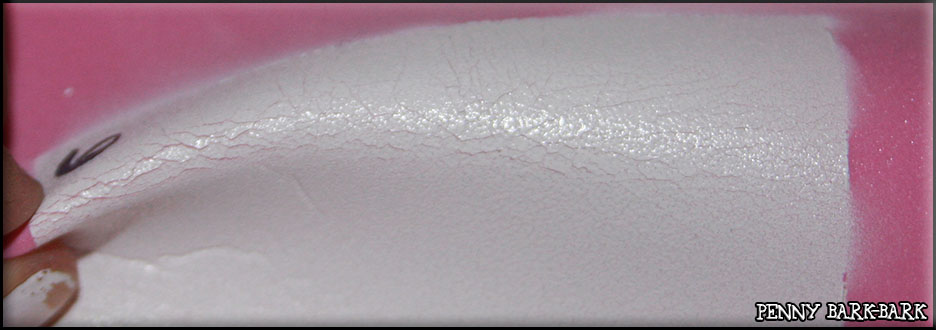
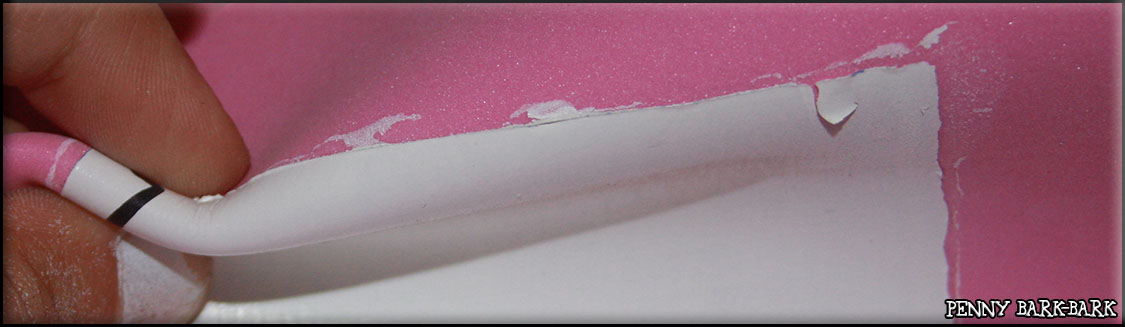
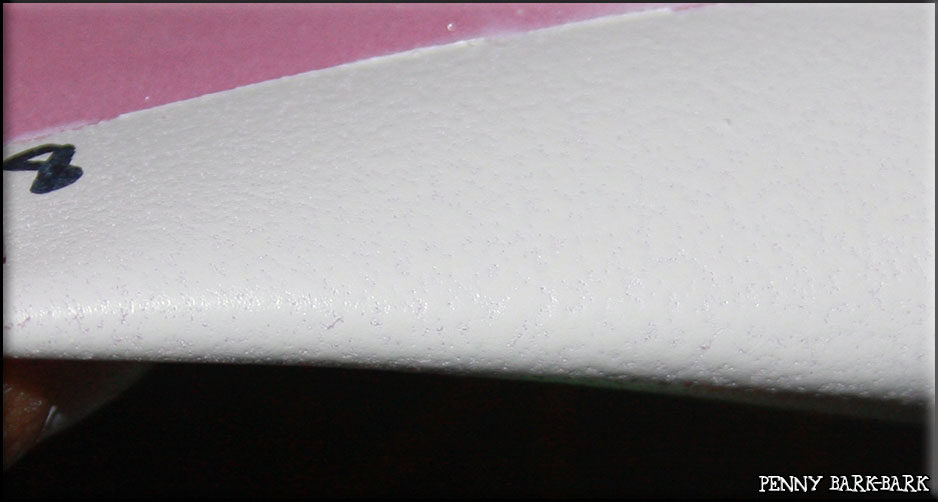
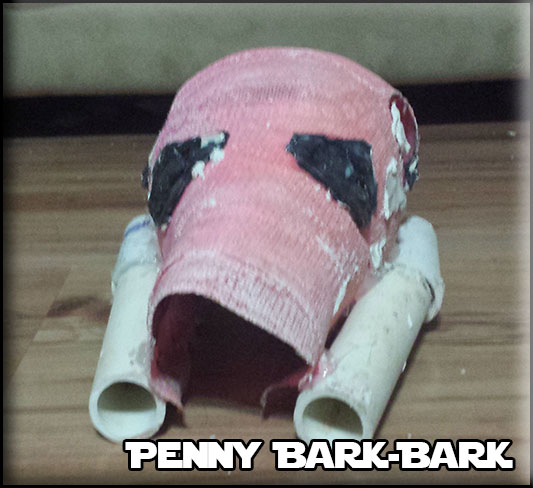
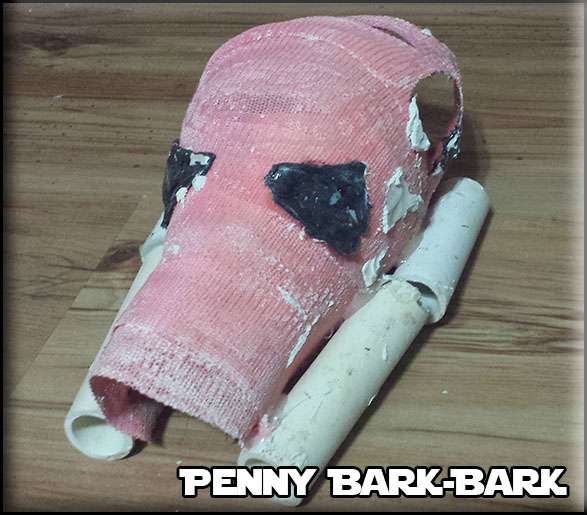
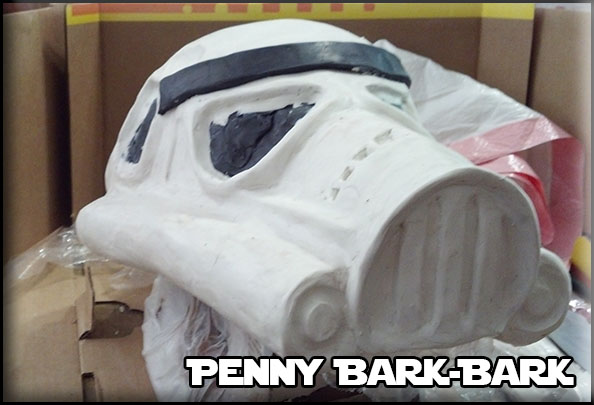
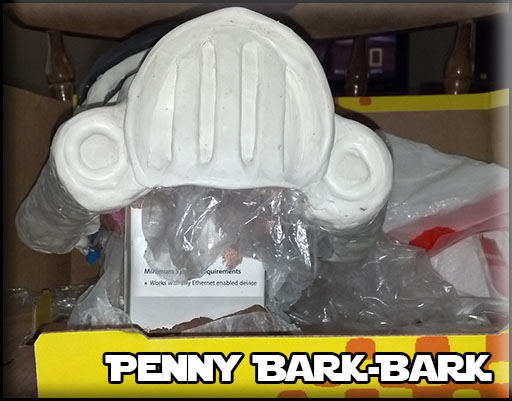
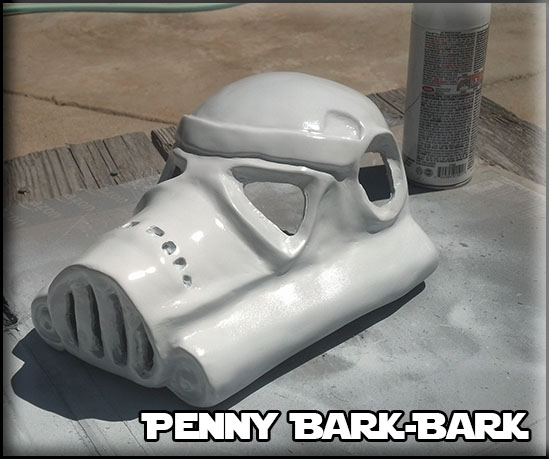
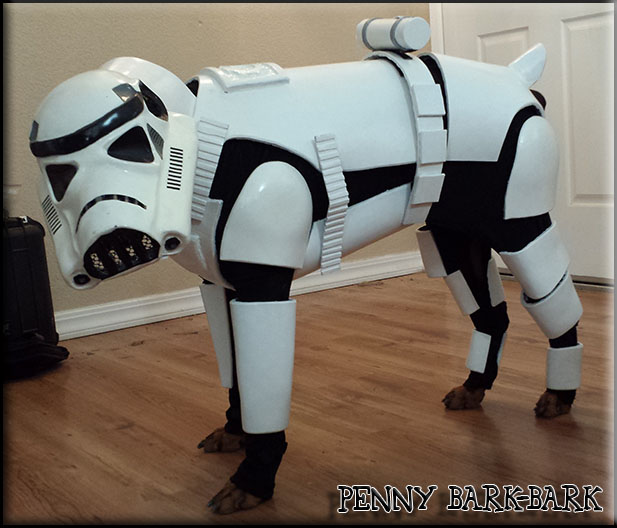
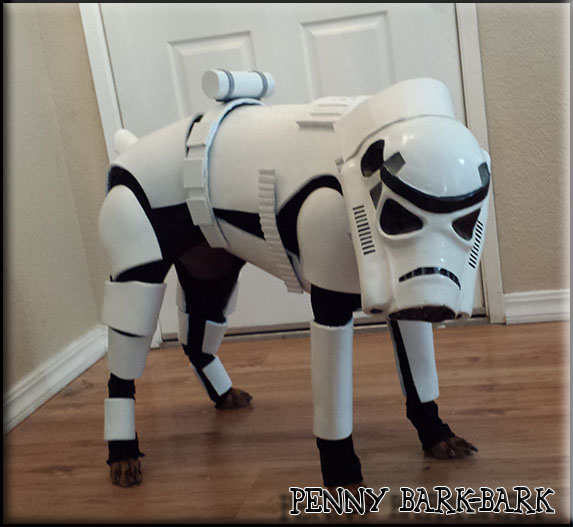
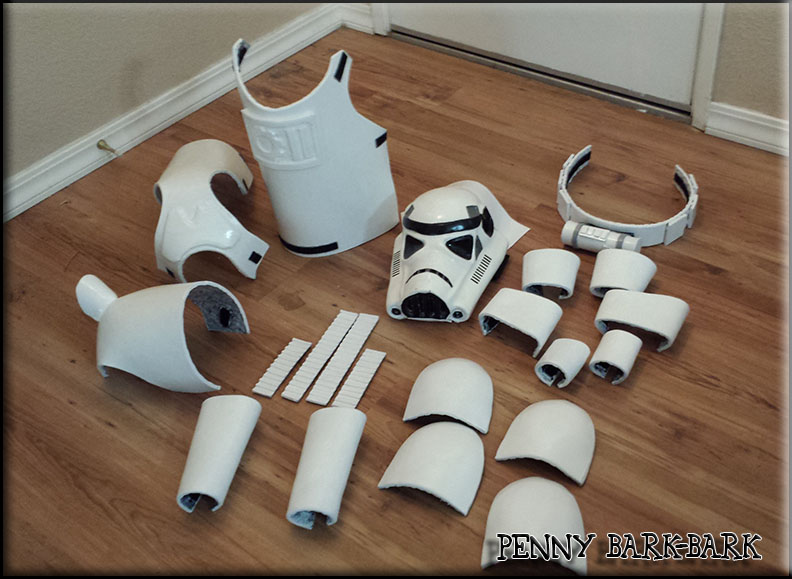
Now that we had my head shape, we cut out big holes for plenty of eye room and big ear holes. The pics below we taken after the complete build, so the black spots are still covered in clay. Next we wired PVC pipes to the side to give the helmet one of its be recognizable features of what appears to be part of the breathing unit.
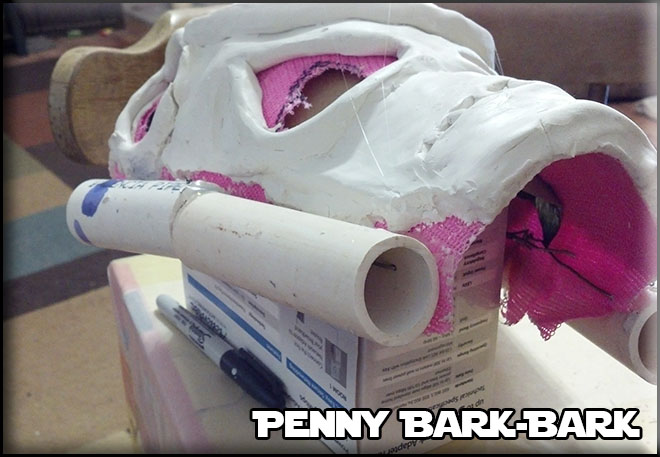
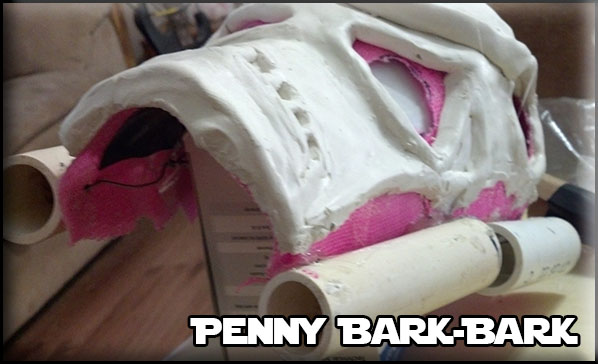
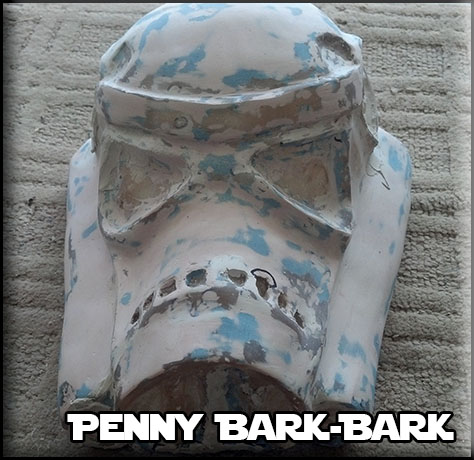
Next, the sculpt. Lets start by saying Mom never took art class (dang math nerd!) and is not artistic so she knew she was going to need a lot of time. Knowing this need for time we choose to use Original Sculpey Polymer Clay. Helpful hint.. get it at Wally World (Wal-Mart), its cheapest although you will have to check often because our local one here sells out fast. This clay stays pliable until you bake it giving you lots of working time. Below are pics of sculpt.
Once we got everything molded and ready for casting, Mom took it out to the garage and guess what DROPPED IT!!! Yes she DROPPED IT! Luckily the clay was so thick the damage was minimal, however you can notice a little bit on wonkiness in the final helmet which we think was the drop.
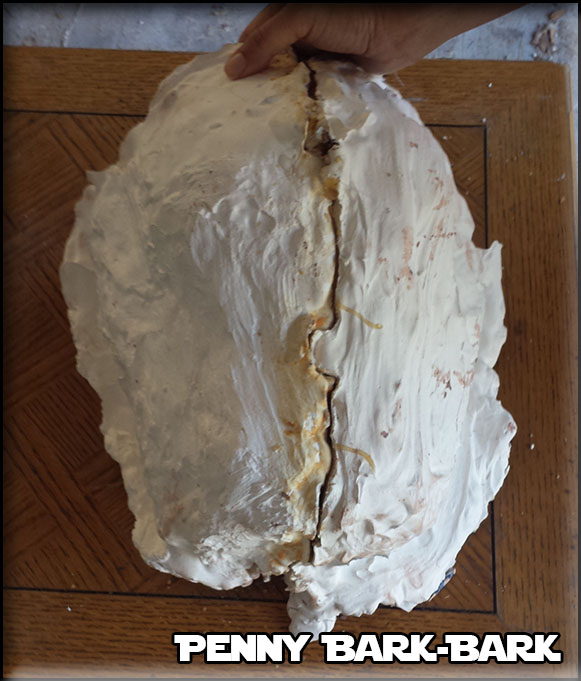
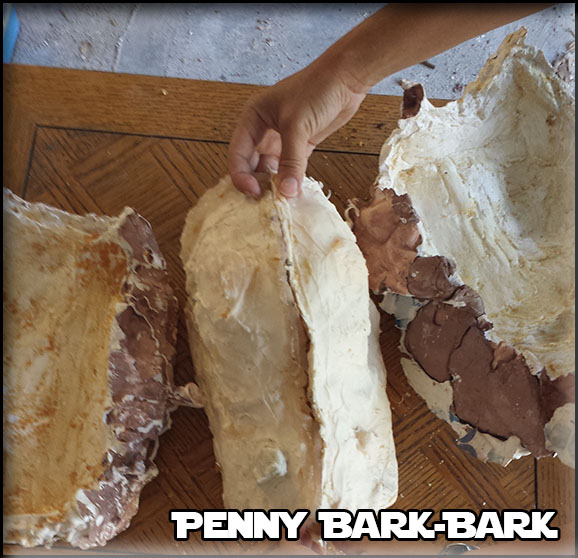
So now the casting process. We chose to use fiberglass as our helmet material. Why you ask? Only because Dad is a car guy so he is familiar with fiberglass and we didn’t want to build a vacuum forming system to use plastic (although we want one now!). So step one in this process for us was GOOGLE! We searched and searched on all different home casting techniques. One of the first rules we learned was if you are going to cast a hard material like fiberglass then you will was a soft mold like silicone. However here in Redding, CA you can’t find good silicone casting material so we looked for a good home made recipe. If you google Sugru or Oogoo substitute you will find a lot of good talks about them (add “cosplay” or “helmet” to your search). I went with a mixture 100% Silicone Caulking (clear), corn starch and orderless mineral spirits. The my mixture was approx 1:1:1 but I really suggest you spend the time googling people with more experience. I ended up making a two part mold from silicone followed by a 2 part mother mold made of plaster of paris.
Here is the mold post helmet, I am pretty sure it will not hold up to another pour, however since we did make our helmet from fiberglass I could make another mold using the helmet.
After we made the mold, next was the fiberglass, once again if you want details please look google experts. We used a polyester fiberglass which is the type you get at the auto parts store. When we pulled the mold, the fiberglass was pretty rough, it had lots of bubbles because the first few mixes of the silicone mix wasn’t as smooth as the last several (we learned as we went), but since this is another reason why we chose fiberglass, it can get fixed! We with the help of fillers like Bondo, fiberglass resin and A LOT of sanding by hand (no machines will work with this odd shape) we finally had it! This was the most time consuming part of the whole build because of all curves we couldn’t use any machines or blocks for sanding, it was all by hand.
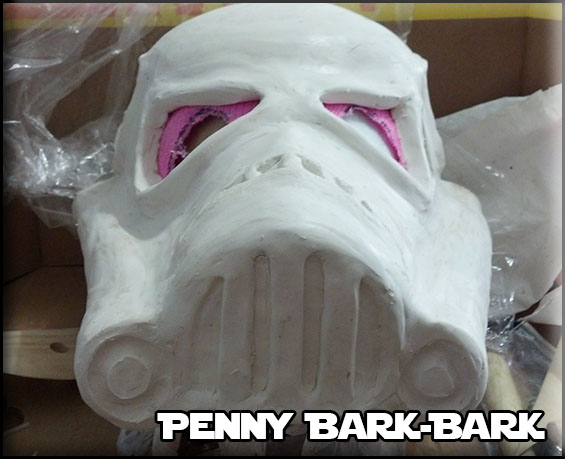
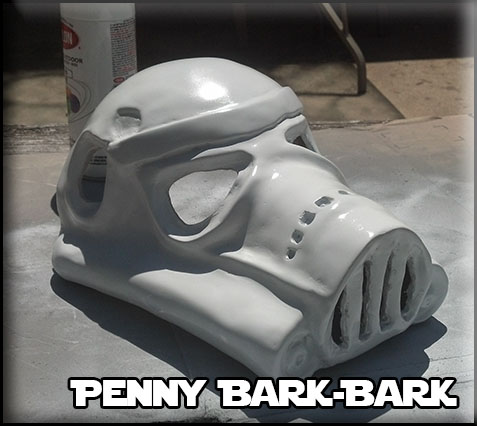
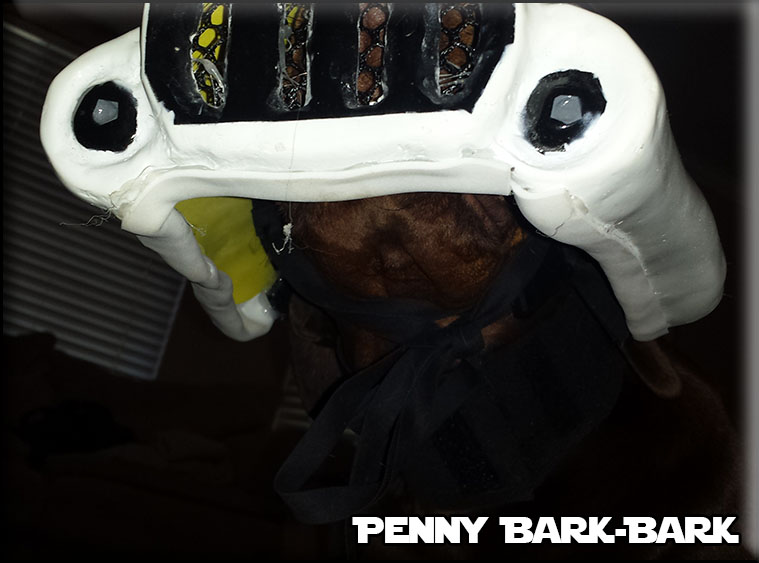
Next the paint, not much to say, we just used a filling primer, lots of wet sanding (all the way down to 2000 grit) and hi-gloss Krylon paint. The lenses are made from a car window tint on a clear plastic sheet, the kind that comes on reports people make, before you ask, no Mom did not steal this from work we found an old presentation Dad did that had the clear cover sheet. Although we thought about going with the dark green lenses like the actual movie props, trying to find that color tint would have been difficult and lets face it, most people think the lenses are black.
Finally how its strapped on. On the interior we put on foam padding for spacers and an additional layer of craft foam for final padding. We then added loops made of bias tape (folded fabric strips) so we could loop our straps made of bias tape throw. There are enough loops to make two straps that tie under my neck. However these two straps were not enough because if I dropped my head it would slide forward. So we got a 4 inch wide band of elastic that goes around my neck then a few of helmets loops then are tied back into this elastic neck piece. It is a bit of a mess of straps, but it works!
Sorry I haven’t updated this page in a while, it’s because we have been working on our Halloween costume and it is finally done! Although we are still working on Big Brother Trey’s costume.
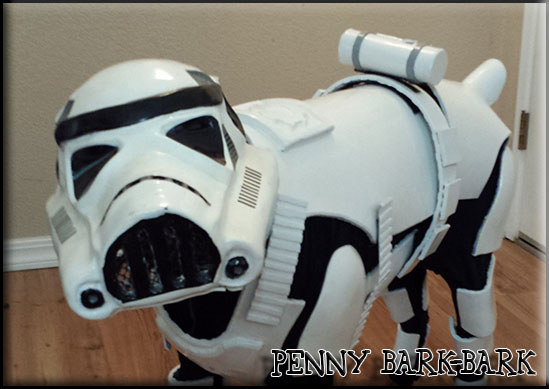
This was Mom’s first build of this type. The body is EVA foam so I can move around and helmet is fiberglass, Mom’s first ever sculpt and cast. I’ll try to come back and post more detail and of the trial and errors on this costume later.
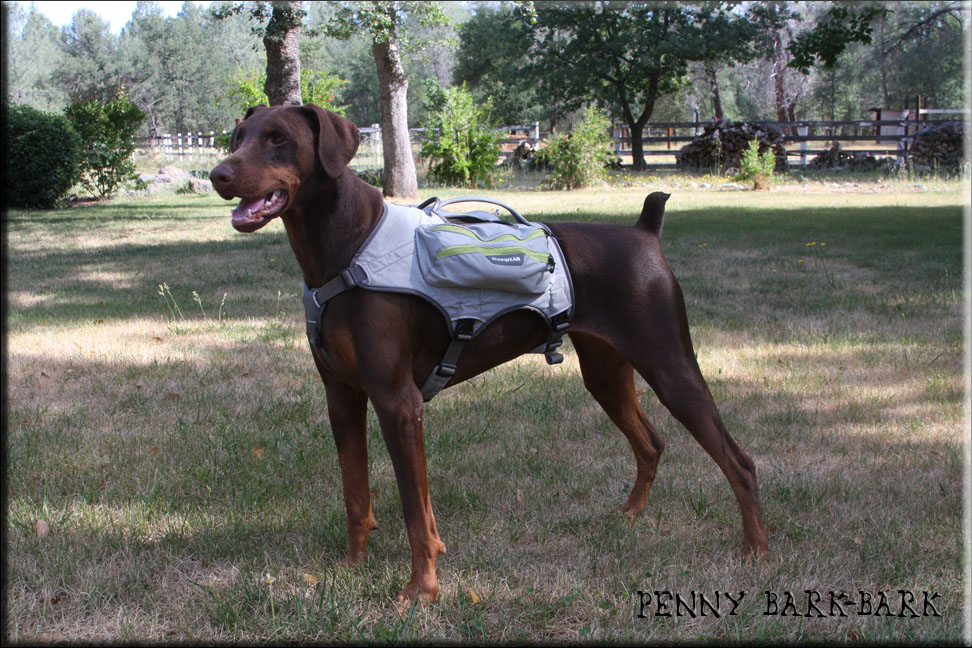
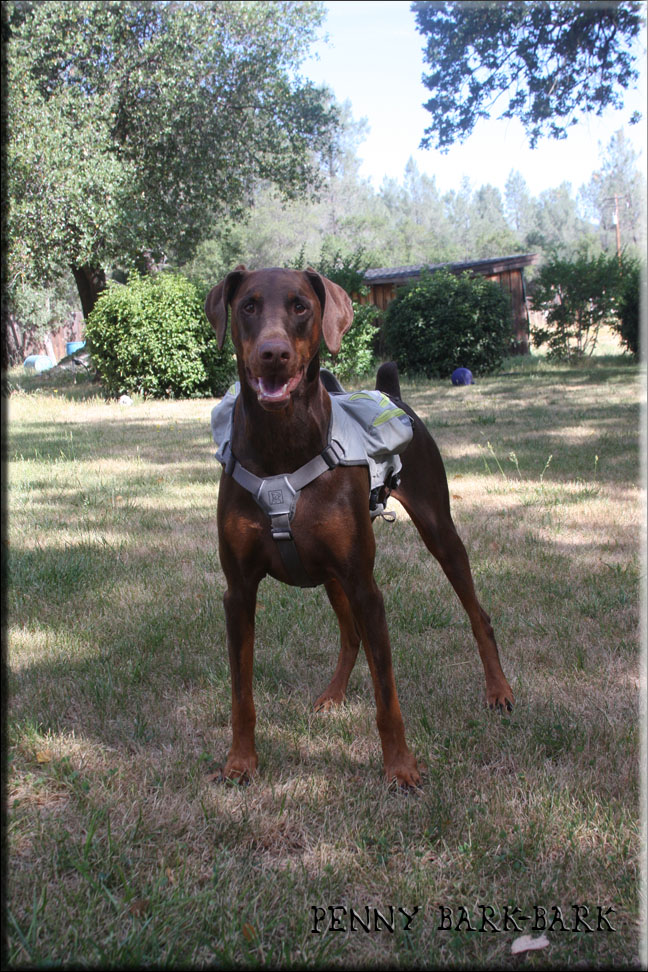
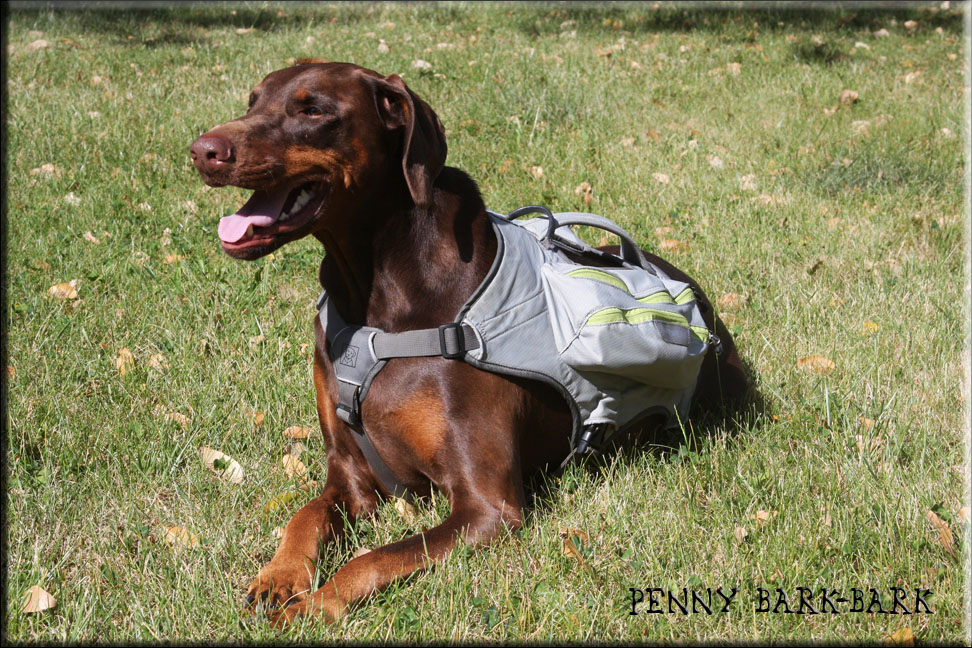
The Ruffwear Singletrak is my 3rd backpack and by far the most expensive. I got this backpack mid-March and since then have put well over 100 miles on it so I think I would consider it broke in and ready to review. I normally like to keep reviews short and to the point, but I think pack deserves a lot more of my time so you can get a good idea of what it offers if you are considering getting one. Since I am going into detail I broke the review into different sections so feel free to skip to your particular interest.
Why I chose the Ruffwear and specifically the Singletrak-
To be honest I arrived at my decision to buy Ruffwear by the amount of good reviews I found online for their different packs (maybe you’re here for the same reason), and I like the idea how their harness looked (comfortable). Prior to getting this Ruffwear I had an Outward Hound backpack, which wasn’t too bad, it just had the potential to rub (here is my review). So after reading (well Mom reading to me) a lot of the reviews I have to say I couldn’t really find a review that covered my needs. A lot of the good reviews are done by people that go on all day hikes or camp trips. My hikes range from 1-1.5 hours (5-6 miles) with some of them being trail runs. The reason I really want a pack is to carry my water for the warm days and just to carry weight in general (Mom says I am best when I am tired.. WHATEVER!). Since most of my time on the trail is spent running, jumping, climbing and pouncing on things while off-lease, we really wanted a pack that would hold the water tight against my body and not have it fly up then slam into my side when I jump. For this reason we immediately eliminated the Approach Pack from my list. The Approach doesn’t have a “compression system” to push the water against my body. So since I wanted to stick with Ruffwear I was left with two options, the higher priced Palisades or the lower priced Singletrak. The Palisades does offer that compression system, however the bags are huge and really designed for an all day or overnight trip which is a bit excessive for my needs and I wasn’t sure how well that compression system would work to keep the water from bouncing. Now the Singletrak on the other hand doesn’t have a compression system but it does have small pockets the water bags fit into that is part of the harness, so them means if the bags are full or half empty they would not flop around although they might slosh a bit if you leave a lot of air in the bag. After evaluating my needs we decided the Singletrak would be the best option for a bouncy, trail running, and hiking dog like me, it would give me the option to carry my water and have just enough room for a leash, poo bags and a smartphone.
Where I got the Singletrak-
Second let’s talk about where I purchased the Singletrak (so feel free talk skip this section if you don’t care where I got it). Knowing from previous experience how important fit is I wanted to at least go to a local store to try on Ruffwear. This way I can get my size and not guess and play the return game. So after Mom searched Ruffwear’s website and the internet in general we found a few local retailers which included Sportsman’s Warehouse, Redding Sports LTD and a little shop called Hermit’s Hut. After comparing prices Hermit’s Hut had the backpack on sale so I decided I would visit their shop. Being the person my Mom is, she of course called ahead of time to check with the store to see if they were okay with me coming in and they were (FYI Sportsman’s and ReddingLTD are both pet friendly) so off we went to Hermit’s Hut.
When we arrived at Hermit’s Hut there was a distinct odor of cat urine, now Mom and Dad aren’t the oversensitive type when it comes to smell (I do have 2 cat siblings) but it was pretty strong so I think we must have arrived after a tom-cat left his mark. Other than that, I would describe the store as a small store in a low rent district (but we didn’t feel nervous to be there) with a a lot of outdoor gear. When we arrived their pet section was right by the door, however it was a small selection of pet items. The Singletrak they had in stock was a size medium so it didn’t fit but it still gave us the idea of what it would look like in my size. They did however have a Ruffwear Palisades in stock and in my size (Large/X-Large) that I was able to try on and see. To be honest at this point we still weren’t sure if we wanted the Singletrak or Palisades. After a good test fit, we talked to man in charge about ordering the pack and he said once we decided, we could order it online and leave a note to pickup in store or he could just ship it to us. So after a couple days of thinking over the packs we decided on the Singletrak, placed our order online and decided to have it shipped (it was free shipping). Since it wasn’t in stock it did take 2 days before we got a confirmation it was shipped but it arrived the next day as expected. Overall I would have to say the transaction was smooth, my only complaint is about the store odor, but for the price I would still recommend them and I do hope the odor is gone by now.
Features of the Singletrak-
The Singletrak is a very simple, sleek pack that I believe is a great design for dogs that go out on runs or hikes that are no more than a few hours. Basically it’s for those of us that don’t need to carry food, just water or weight. The Singletrak uses the same type of design as their Web Master Harness (I don’t have one), but basically there is a Y yoke in front that is padded were all parts of the Y meet for the chest piece, a padded strap that goes under the chest and another padded strap that goes behind the chest. The chest strap does not disconnect from the the harness on both sides so has to be slid over your head and you will have to pick up your right leg over part of the yoke so the strap that connects the yoke to the chest strap can fit into place. Overall these straps and buckles are very sturdy and padded. All this padding really shows they thought about those of us with thin fur coats.
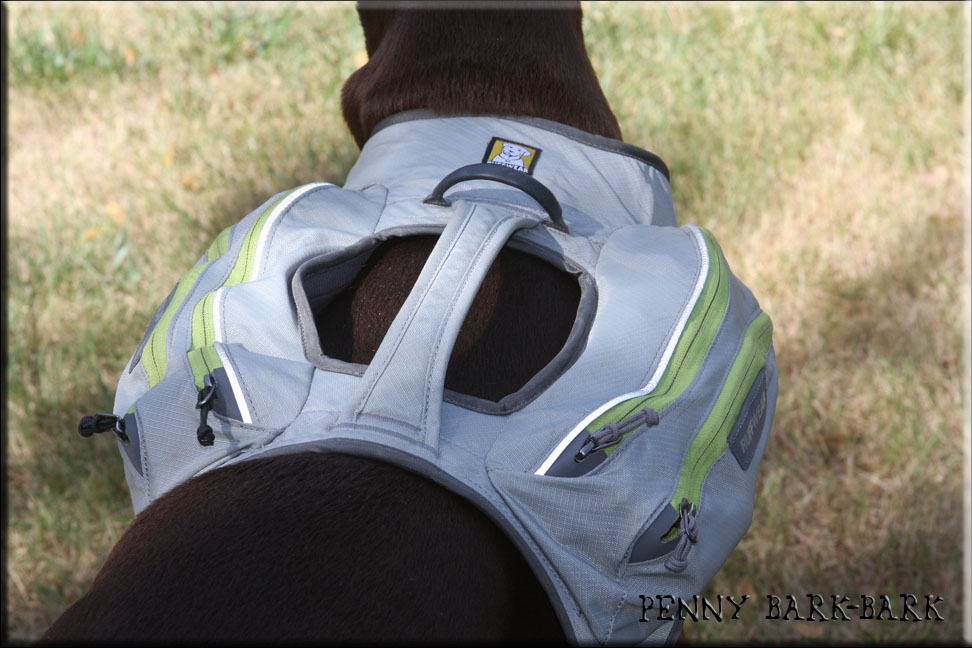
The top part of the pack has a large nylon loop that you can clip things to (I assume a leash too, but not sure if I would trust it to hold back a large dog) and a handle. Now mom’s first thought about that handle was that it would be useless on a large dog since she couldn’t use it to assist me going over large objects like intended, but she quickly found a use for it after a few miles. The handle turns out is a great alternative for a short term leash. What I mean is, if you are on an off-leash run like I normally do, occasionally you come across other dogs or people and Mom insists on holding me. So instead of pulling out the leash each time, Mom just grabs the handle and walks me past the distraction then lets go. This really beats having a leash tied to the pack for easy access.
The underside of the harness that rests again my body really shows the quality of this harness that once again that they kept us thin coated dogs in mind. It is nicely padded to protect me from anything put into the pockets that could poke me and cushion me if I have something that wants to bounce in the pack. With this padding I haven’t seen any sign of rubbing and overall it really makes it comfortable. The only down side is, I could see this as a place that could get stinky since it would adsorb, so as mom says, not rolling on dead animals or their poo.
Underside of pack
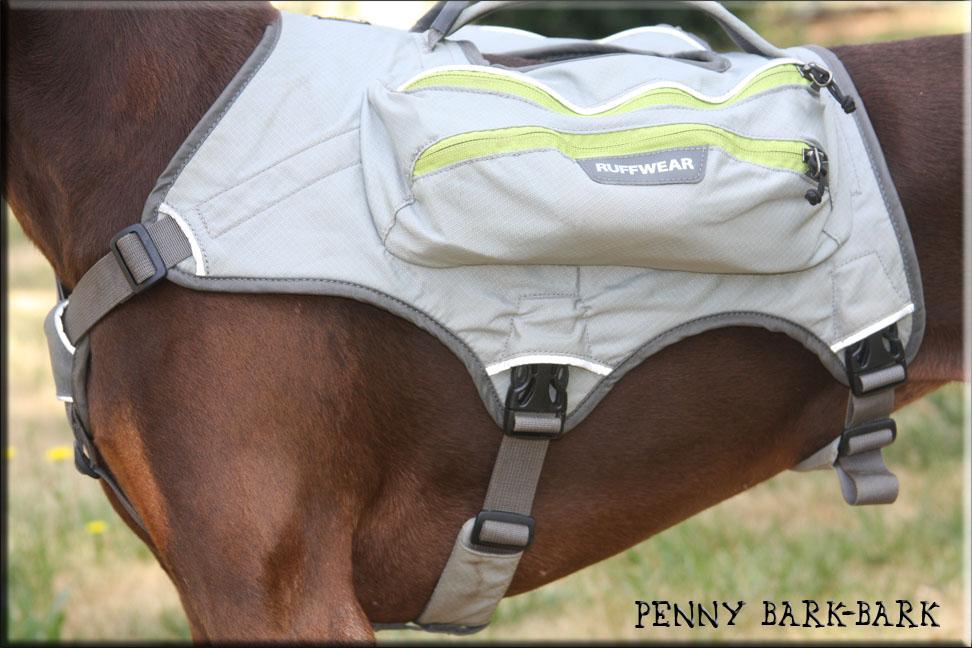
As far as the compartments, each side has two pockets that are separated by mesh, I mention that just in case you want to carry electronics. If your water pouch spring a leak or you don’t screw the top of the water pouch tight there is no barrier so I would Ziplock electronics to be safe. The main pocket is where the water pouches are stored and there is a smaller pocket that lays on top of these, each with their own zipper access. The main pocket is designed for just the water pouch however you can fit a bit more on there, Mom puts the water bottle and my leash in one side and on the other side is the other water bottle and a couple rocks to balance out the weight. The small pocket is not very deep but mom can just fit her Droid 4 smart phone in (so I can see the crazy miles I put on using the GPS feature) but of course had room lengthwise to shove in some poo bags and other small bits if needed. Bottom line is this pack is meant to carry water and maybe poo bags and treats, don’t expect to be hauling your meals or extra water bottles (besides the pouches).
Singletrak pockets
The water pouches are made of a nice thick plastic with a top that you see on a lot of sports bottles. If you currently haul bottles you will love these pouches, they nicely conform to your body making them much easier to haul around with less sloshing. My understanding (I might be wrong) is the earlier versions of the Singletrak came with pouches that were more like the Camelbak hydration packs where they had a tube the would come out for easy pouring which I think the Palisades still does. I would have loved to have that option, just to pull out a tube so Mom didn’t have to remove the whole pouch for water. I guess from what I read people complained about them leaking, but if I can find Camelbak packs in the right size I may trade these out for that convenience or buy an adapter. Of course I might have to modify the pack a bit, but it really would be a lot faster to pull a tube out than the whole pouch.
Fit-
I guess before I describe the fit of this pack I should describe myself. I am 70lbs of very lean, mean, red-headed barking machine. I have very little body fat and lot of lean muscle, so from a distance I look skinny, but up close you notice you don’t see any ribs just muscle. Overall this pack fits good, is has just enough adjustment on the rear strap to get around my tiny waist, but if I were any smaller we would have to trim down the padding. To be honest I would rather have to trim padding than not have enough. I think when it comes to the straps that go under my chest and stomach have a lot of adjustment however if I were a big-wide breed dog I might we worried about the yoke adjustment because it doesn’t appear there is a lot but I can’t be sure. So if you are a wide-chested dog it would be a real good idea to try this on in-store to make sure it fits.
The problem I was having with the pack was it wanted to slip sideways. I *think*The Ruffwear Singletrak is my 3rd backpack and by far the most expensive. I got this backpack mid-March and since then have put well over 100 miles on it so I think I would consider it broke in and ready to review. I normally like to keep reviews short and to the point, but I think pack deserves a lot more of my time so you can get a good idea of what it offers if you are considering getting one. Since I am going into detail I broke the review into different sections so feel free to skip to your particular interest.
To Sum it up..
Pros:
Great for carrying water without it bouncing
Very adjustable so very good odds you should get a good fit
Lots of padding to prevent almost all rubbing
Very study and you know it is great quality the moment you handle it
Cons:
Price (but I don’t think its overpriced for the quality)
No much room for anything but your water
There might be fitting issues if you are really big chested or even really skinny.
Price:
Approx $90, however check around for sales!
Recommend:
Yes, for those of you who are really active but need to carry some water or just needs to carry weight.
Additional Notes:
Didn’t I give you enough detail?!
Suggestions for Manufacturer:
1. Hook up with Camelbak to improve your water system. What would be great is if you could hook the bags together through a tube system (across the yoke?). It could help to equalize the water levels so you don’t have to worry about trying to take the same amount of water out of each side to balance your load. Overall just having the tube system would be nice so you don’t have to remove the whole water pouch.
2. How about adding another buckles to both sides of the harness for the straps that go under my chest and waist. If you were using cheap ones I wouldn’t recommend it, but you are using quality ones so this would make it more convenient when taking the harness on or off and make it so we don’t have to lift a paw to get into the harness. Not that lifting a paw is hard and I do it out of habit now, but if I hurt my left leg it would be nice not to have to bare by weight on it to take the harness off. I guess I am lucky my running injuries have happened on my right side. Plus it would make it easy to get on/off the harness if you are in tight quarters like the back seat of the car.
3. Add some padding to the bottom strap of the yoke, when I will still test fitting I had it slide sideways it did rub a little in my armpit (I got sensitive skin because of my thin coat).
This month’s BarkBox rocks, it has a Bionic rubber toy!! I already have a Bionic ball, so this automatically gets high marks. So here is what we got.
Bionic Urban Stick- Medium – $16 on Amazon
Nootie BBQ Chicken Jerky Chews (grain free) – 5oz – Approx $4 ($13 for 16oz) on Nootie.com
SnickySnaks Apple Cobbler Treats (no corn/wheat/soy)- 6oz – Guessing around $6 (found 10oz of another flavor for $10)
Zukes Z-Bone (grain free) – Giant – $7 on Zukes.com
Total Approx Retail Value $33 (without shipping)
As always, here is the Barkbox info My Original Review
As of 3/20/14, and this includes shipping to Continental US
$29 for 1 month
$72 for 3 months ($24 per month)
$114 for 6 months ($19 per month)
$199 for 1 year ($16.58 per month)
Get $5 off if you use this link (my referral)
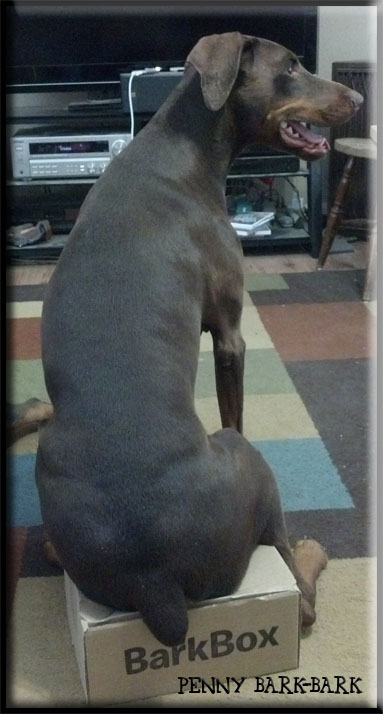
Making sure no one steals my BarkBox, looking at you big brother Trey!
The moment after Mom took the picture I stole the Bionic Urban Stick
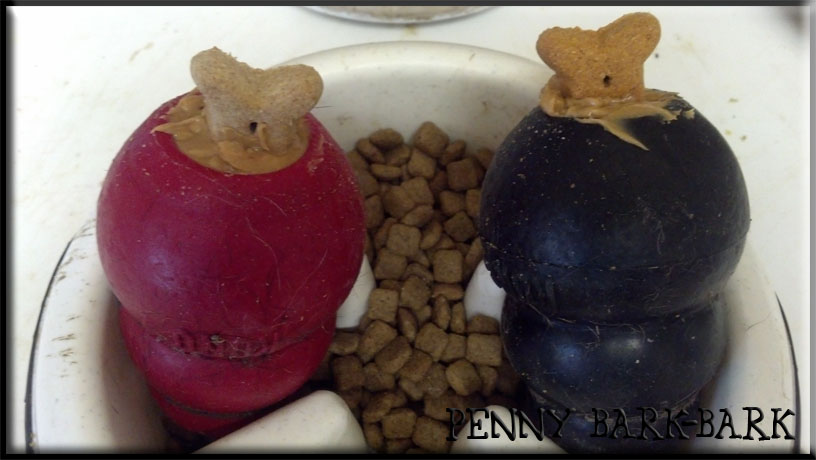
I saved the best for last, at least my favorite Kong toy. Drum roll…tatatatatatatatatat.. It’s the Kong classic. Why having such a boring toy as my favorite? Because Mom fills them with love.. okay, not love dog treats and PEANUT BUTTER!! These Kong Classics can be used a general chew toys or something to play fetch with but their best use is as a treat filled goodie ball to bribe us pups. Mom stuffs the ball with either treats or just plain dog food but then she plugs the hole with peanut butter and puts them in the freezer overnight. Then when Dad leaves for work in the morning Trey and I each get a Kong ball and head into our crates to eat our sweet treat.
Pros:
Multi-Uses (Play/Treat)
Multi-Sizes (XS, S, M, L, XL, XXL)
Lots of room for treats and peanut butter
Cons:
Really hard chewers can destroy if left unsupervised (our vet posted an article on it)
Recommend:
YES, but only if you parents are going to fill it with lots of love aka treats and peanut butter!
Mom got me a Kong Traxx (tire) since I have an obsession with another tire toy I had but to be honest this one does nothing for me. I have two other non-Kong tires, one is smaller and the other is a much larger tire and they both get much more play time. I like to hold the smaller tire in my mouth and squeeze it (collapse it) while the bigger is used for general chewing, tug-of-war and just play carry around and give to Mom toy (I am on my 2nd of those).
Overall I would have to say this toy is just too small for chewing because if it did interest me, just feeling it, I would have killed it. However if you are just the type that likes to mouth toys they you would probably like it.
Pros:
Flexible rubber for pups that like the mouth toys
Cons:
To small for the 30-65lb chewer it is recommended for
Recommend:
Not for the chewer, I think this would be great for a large puppy for the dogs that like to carry and/or mouth toys.
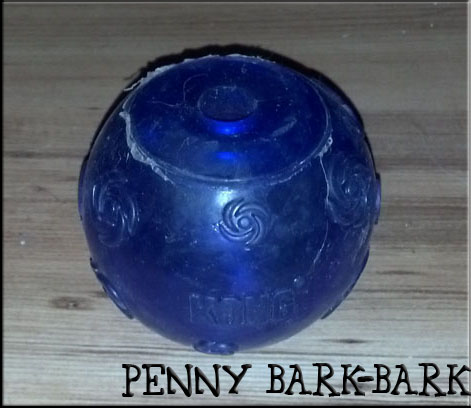
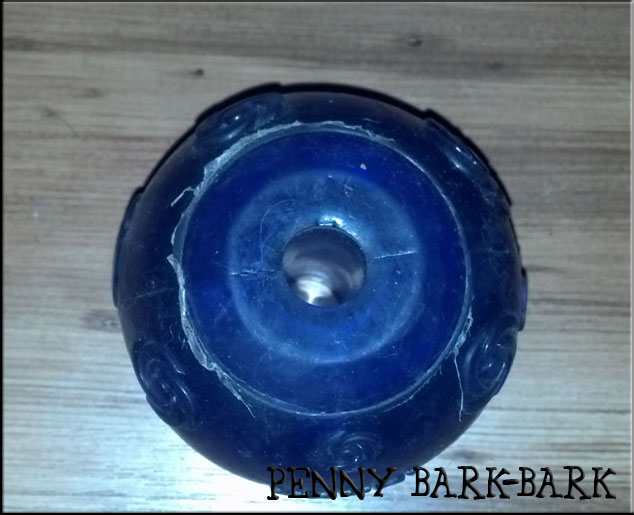
Here is another Kong ball I have, the KONG Squeezz Ball Dog Toy. This is another fun ball I keep around the house. I normally play with this one when I am looking for a squeaking ball. I’ve had this thing for a couple years now and it is still in good condition and the squeaker still works. I can’t rave but definitely can not complain about the toy, after all it is still in good condition. I wouldn’t rave about it only because I have a large selection of balls and this one tends to get left in the toy box most days since I like the slightly bigger, heavier Kong ball I talked about earlier in this series.
Pros:
Overall Durable
Durable Squeaker
Fun colors
Price
Cons:
Bigger than a tennis ball so it doesn’t fit in the thrower, although that is okay because I use this as an indoor toy.
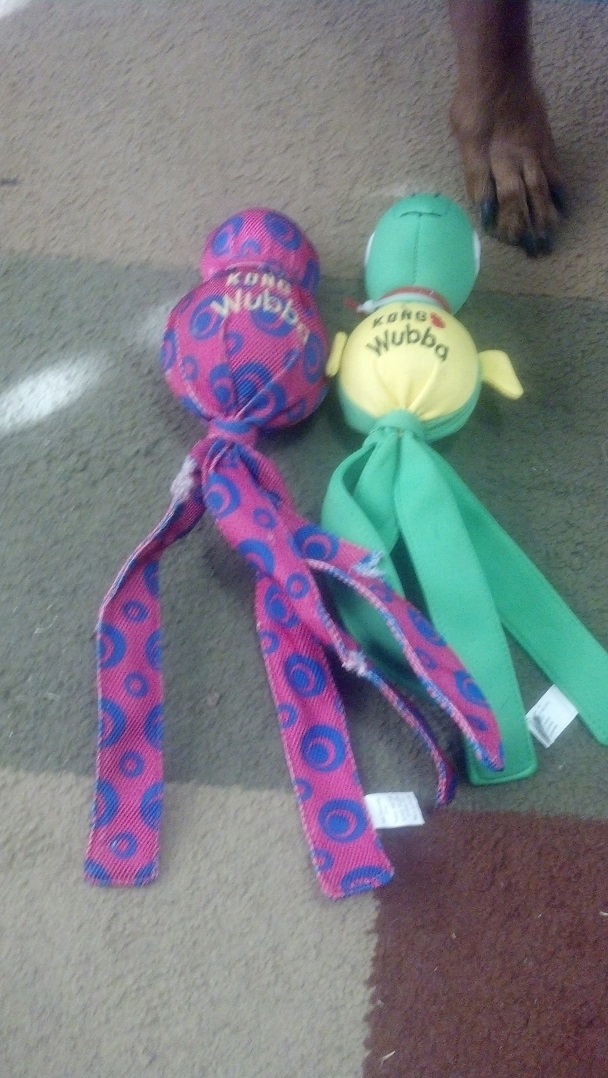
Wubba Wubba Wubba.. I just love the name! To save you some time, if you are a chewer just say NO. Yes they look like loads of fun, but unless you have someone responsible (looking at you humans) to tell you no, then your won’t be able to resist the urge to kill these. If you are looking to have fun with your human then these are a fun supervised toy (like a frisbee). As you can see from the picture below I have Wubbas. The toy on the right (not Trey’s paw) is designed for water use. Mom bought this toy for me in hopes if would get me to swim, but fat chance on that, if my feet can touch the bottom I don’t go any deeper. The toy is a light weight neoprene type material is good for water toys but bad for chewers, give me 10 second alone with this toy and I will kill it. The toy on the left is a regular Wubba which is just two balls covered in a tough nylon. The nylon decent for rough play, but those strings on the bottom wont last a chewer, if you look close you can see the damage I have already done. However this can be a fun toy to play fetch with, when you throw the Wubba it has a lot of surface area to grab and catch it without a lot of additional weight. It is also a fun toy to grab and shake, assuming you hold it by the big end otherwise OUCH!.
Pros:
Easy to hold
Easy to throw
Several options for water, general play and cuddling
A Kong chew toy that is also a dental stick? This has got to be the perfect chew toy, right? Well I don’t have any pictures of this because it long ago disappeared but you can find a picture on Kong’s website under Dental Stick. As you may (or may not) know by now I am a chewer so Mom figured a chew toy that is supposed to be good for the teeth so it would be a good thing for me, but she was wrong.
Well not to say that is product isn’t good, it is just not good for me. I have to admit, I loved the toy it has a wonderful texture that made me want to really chew on it. I would stand with in in my mouth and just squeeze it in my mouth and work it around. However it didn’t take me long to realize if I held it in between my paws and grabbed the end I could chew off the ridges. It was really a shame, I should have just packed this away and hid it in my crate so I could enjoy it out of view. With the ridges quickly ending up as red bits on the floor the toy quickly disappeared into that toy boy in the sky (same place the dryer puts your missing socks).
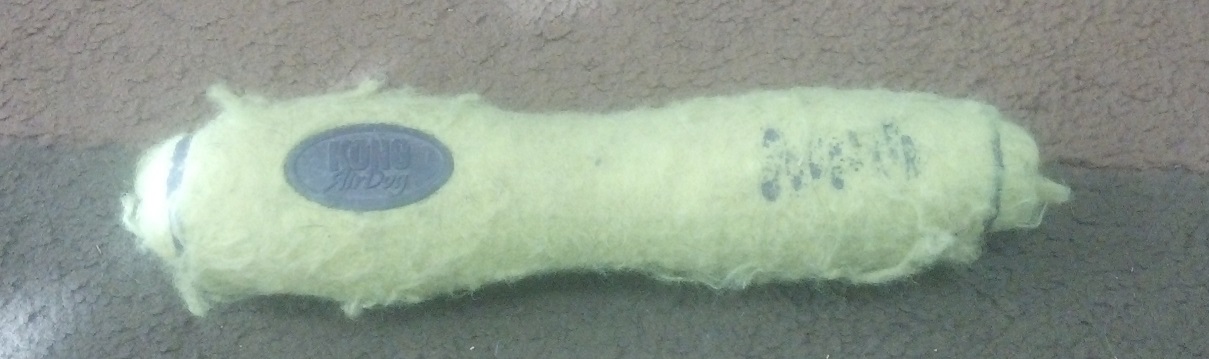
I have to admit this toy has been in our toy box since before I was born. Mom bought this toy for Trey years ago but before I came along, Trey preferred to love on soft plush toys so it got very little play. Going back through my puppy pictures I found a few with this toy. I think Mom hid this away when I got bigger because she was afraid it wouldn’t last with my reputation for toys (with good reason bawhahah). However since we barked about doing a Kong series Mom decided to pull it out of the toy box and let me have it.
After a bit of play here are my thoughts, although it looks like a tennis ball it is a bit more durable with thicker walls than a standard tennis ball. It has the nice fuzzy soft feel of a tennis ball and it is nice to hold. Being long you can hold it in the middle and still have enough out the side of your mouth to waive it in front of your brother/sister but still play keep away. Surprisingly the squeaker does seem to be holding out (normally first to go on my toys) but I think it is because I haven’t narrowed down the location of the air hole so I haven’t stuck my tooth in there yet to pop in/out the squeaker.
Pros:
Like a tennis ball but tougher
durable squeaker
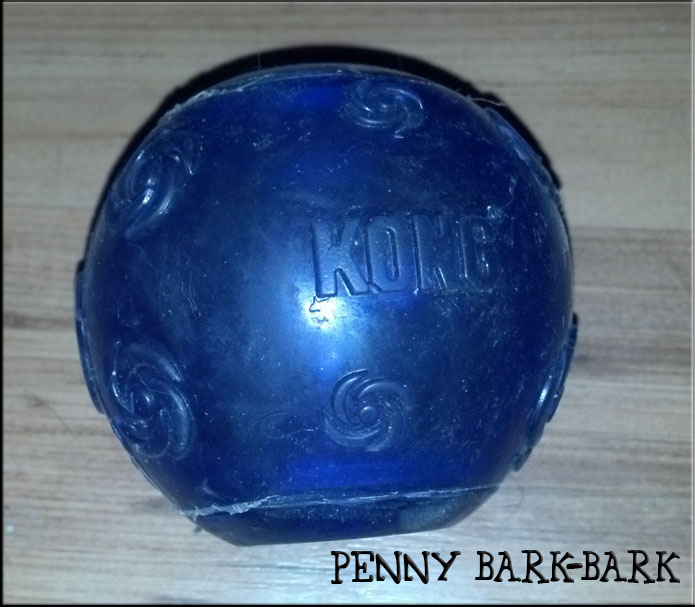
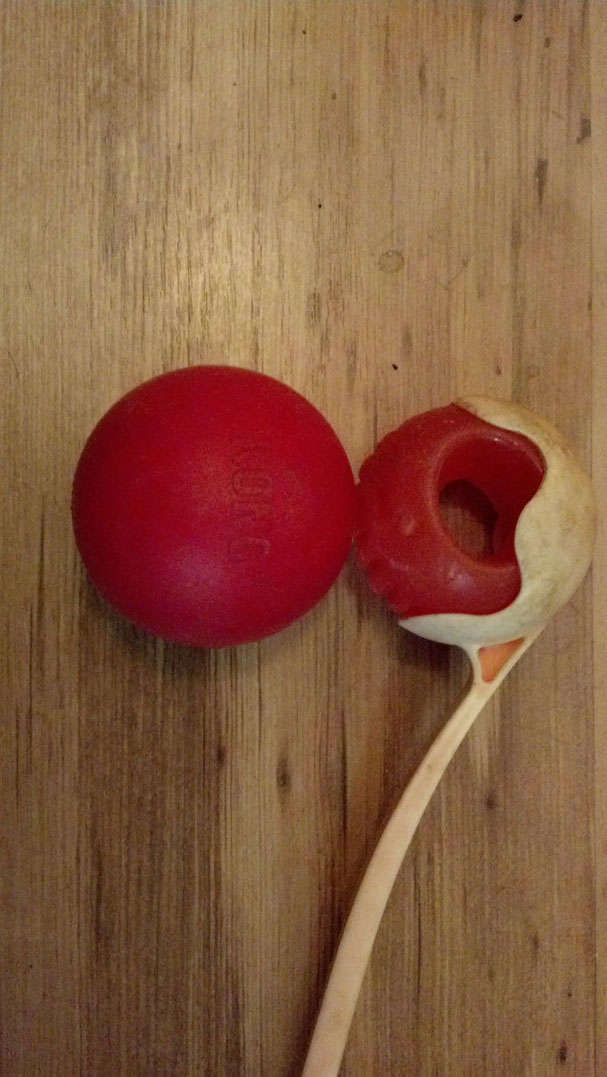
Here is my 2nd favorite Kong toy, the Kong ball. This ball comes in 2 sizes a small and a medium-large. The small is 2.5 inches and the M/L is 3 inches and I of course have the M/L. I love this ball, it is a solid rubber toy and has a bit of bounce and seems indestructible to me. In our house, tennis balls normally last 1 play session (fetch) before they are splitting, but this ball is solid, it has no give at all. The size is also perfect for my mouth at 3 inches I can hold it fine but I can’t grip it in my back teeth or as Mom calls it, The destruction zone (where most toys go to die) so I can’t kill it. After several months of carrying this thing around, inside and out there are not even teeth marks on it. I don’t think I really have a complaint on this one, except it doesn’t bounce as well and doesn’t get thrown as far because it is heavier than a tennis ball. Although Mom does complain if I have this in the house and drop it on her foot.
Pros:
Lasts a bazillion times longer than a tennis ball (for me)
VERY durable
Still has bounce (nothing compared to tennis ball)
Bigger than a tennis ball, so for a mouth my size it doesn’t allow me to chew on it
Cons:
Price, its about $15, but if you play fetch a lot it should save you in the long run if you go through a lot of tennis balls.
Bigger than a tennis ball (also a pro) so it doesn’t fit in the tennis ball thrower.
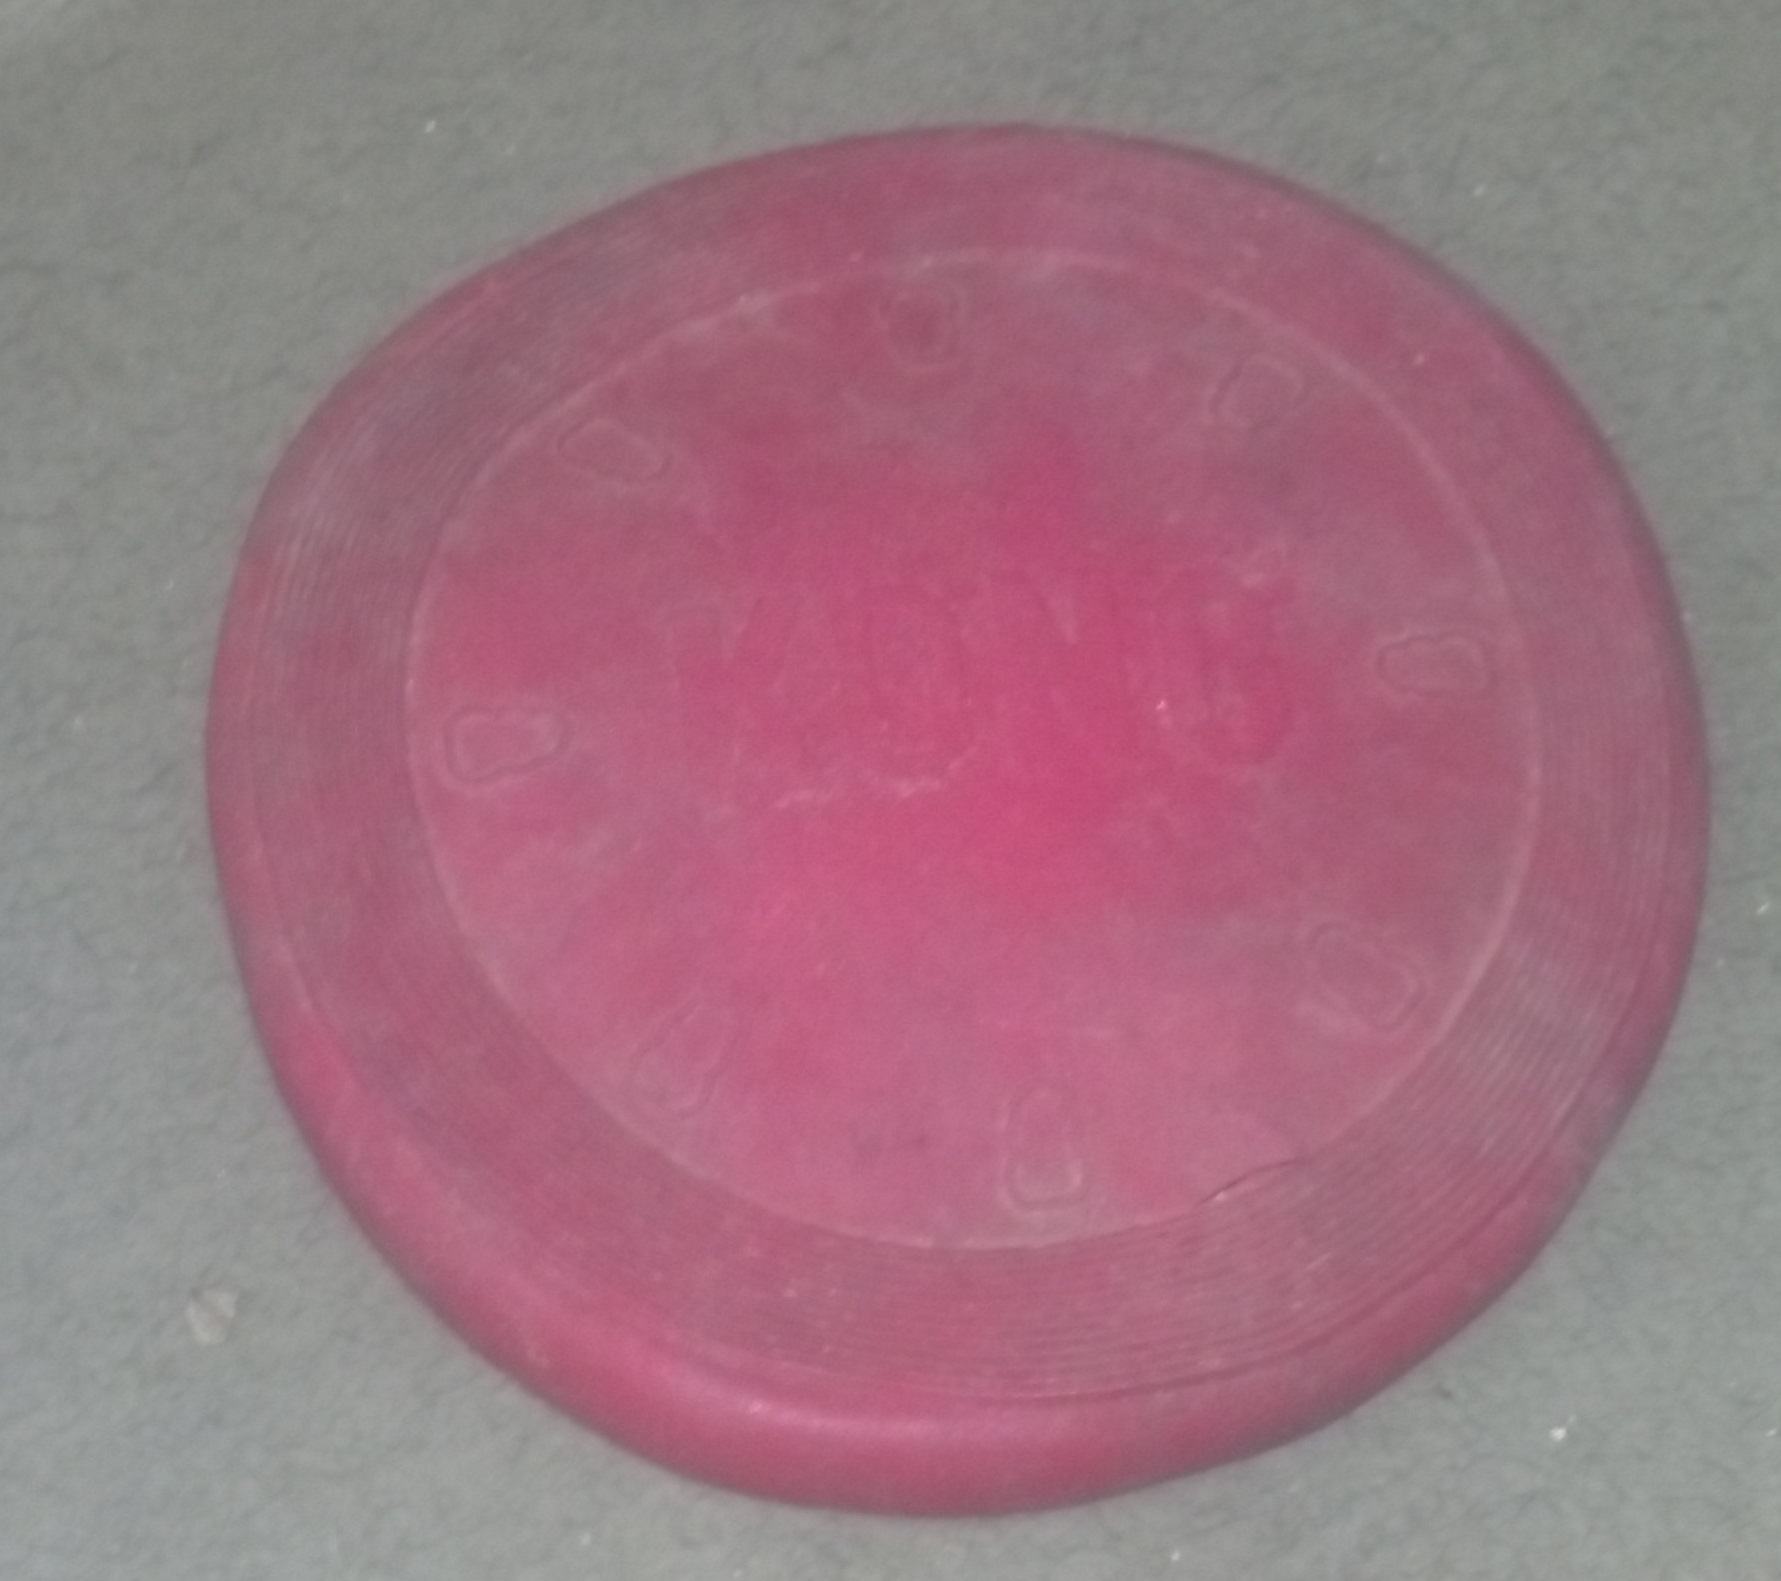
The second Kong product I thought I would bark about this series is the Kong Classic Flyer aka Kong Frisbee. Trey and I have a collection of cheap Frisbees that we got free from dog events. Those freebies are stored away for a rainy destruction day since those last 1 throw with us. When Trey and I pay frisbee it’s more than a game, it’s a competition. It’s all about who can get it first, followed by a game of tug-of-war normally broken up by Mom or Dad. This competition immediately leaves plastic freebie with holes from our teeth and after a couple throws they are toast. Since we enjoy the game so much Mom put out a little extra money to try this Kong flier. After a few plays I have to give it an okay review.
First the flyer is made of the typical Kong red rubber, making it heavier than the typical frisbee so it doesn’t fly as well, but it does fly. Also with our game of tug of war we have ripped a hole in it so it has been reduced to backup frisbee. On the other hand if we didn’t play tug-of-war I would give it better marks since I do love when I get hold of it I can shake it and slap myself in the face (I don’t know why, but I love toys that do that). Personally I have 2 other frisbee options I like a little better, my Chuck It Flying Squirrel has much better hang time in the air and is just as durable, then the Dura Doggie Disc which has better distance is a lot more durable.
Pros:
More durable than standard plastic frisbee
Floppy enough to shake and slap yourself (if you like that)
Great toy if you don’t play tug-of-war but are still rough on them
Looks like it will stand a bit of chewing
A softer rubber than wont hurt your mouth if you chew while carrying it.
Cons:
Pricer than normal frisbees (approx $12)
Doesn’t fly as nice as my Chuck It Flying Squirrel or Dura Doggie Disc
Wont hold out with two dogs fighting over it.
Recommend:
Not Really. I wouldn’t just say “no” because it is a decent product, but I like my other options better. I would recomment the Chuck It Flying Squirrel for dogs learning to catch frisbees, it has a better hang time. Then for those who want flying distance and/or durability I like the Dura Doggie Disc. Honestly I think Kong should consider buying out the Dura Doggie Disc before they get a good hold on that market. Dye it red stamp their name on it and I would believe it was theirs, great design and durability are things I think of with Kong. I did look online and saw that Kong has an “Extreme” version that is black, we might have to take a look at it next time we are in Petsmart or Petco.